Upload Products to Drupal 7 Commerce Video
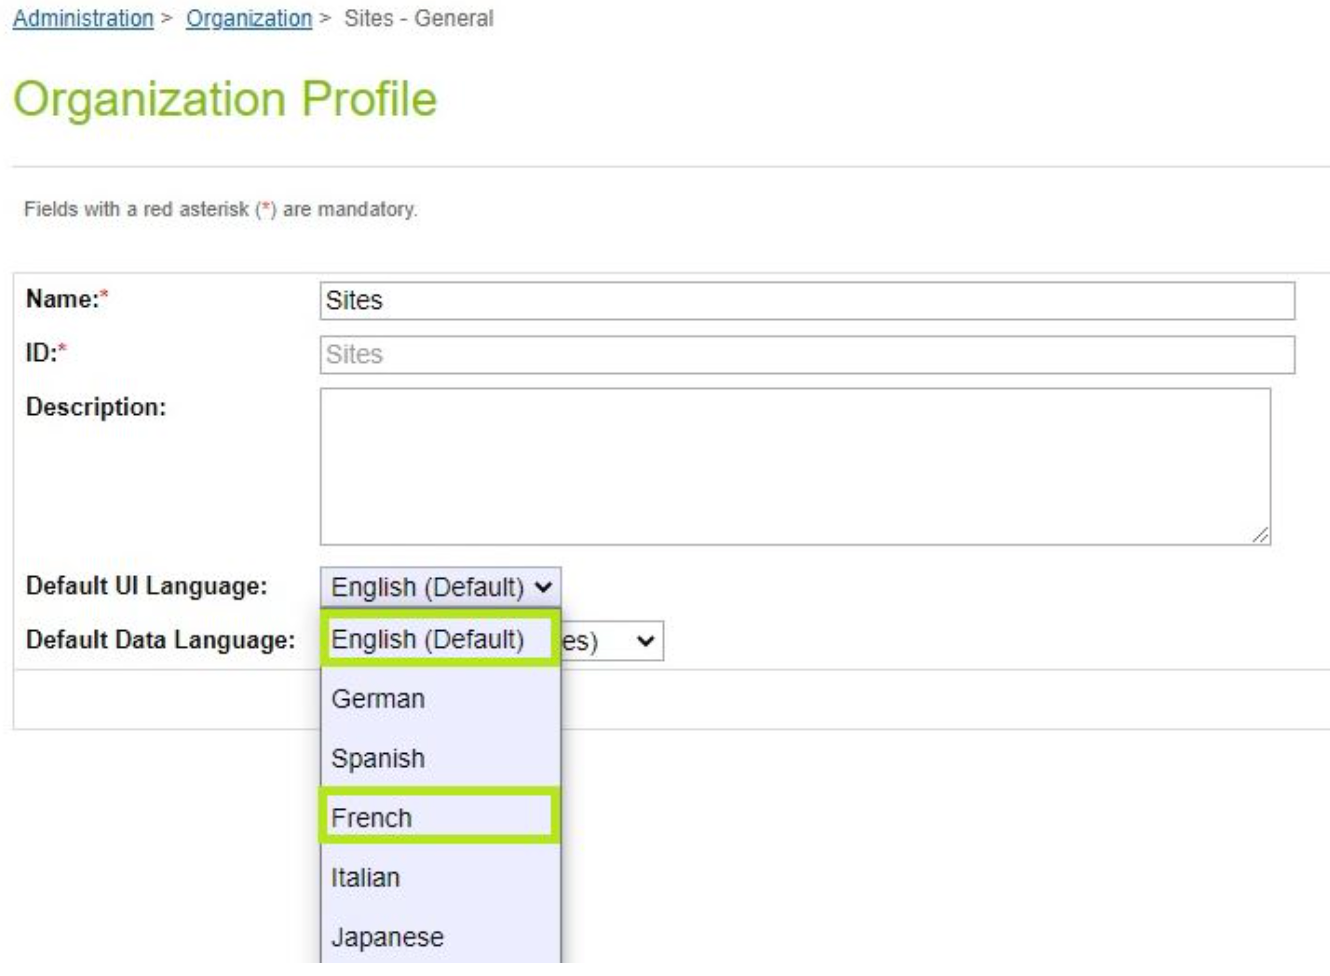
Multiple Language Back up
The extension provides multiple UI language back up for Business organization Director Interface.
Add Video
Below are the steps for adding videos.
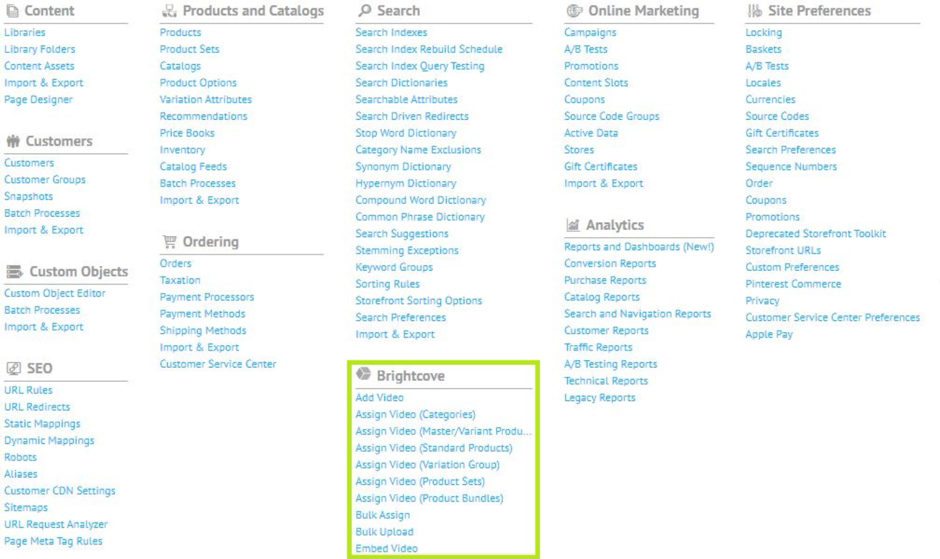
- Navigate to Merchant Tools -> Brightcove -> Add together Video
- Select Language from the card (the default will the default locale selected for the site):
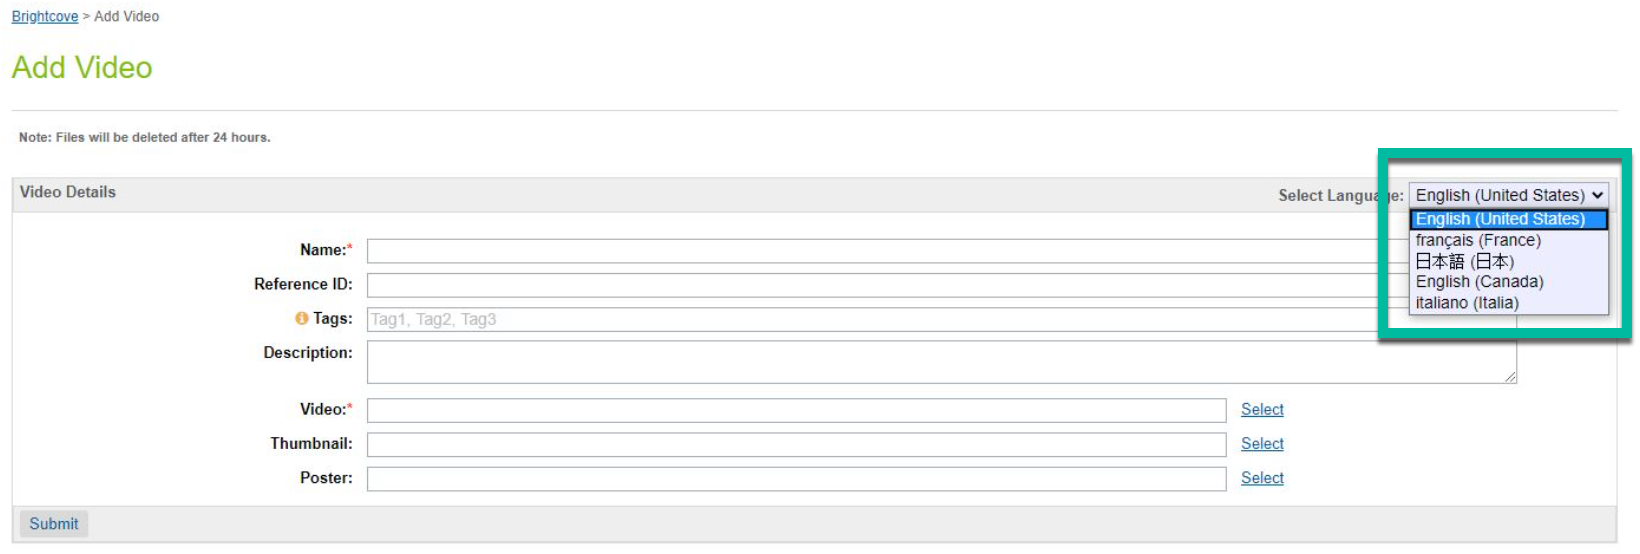
Video Linguistic communication Selector - Click the select option adjacent to Video field.
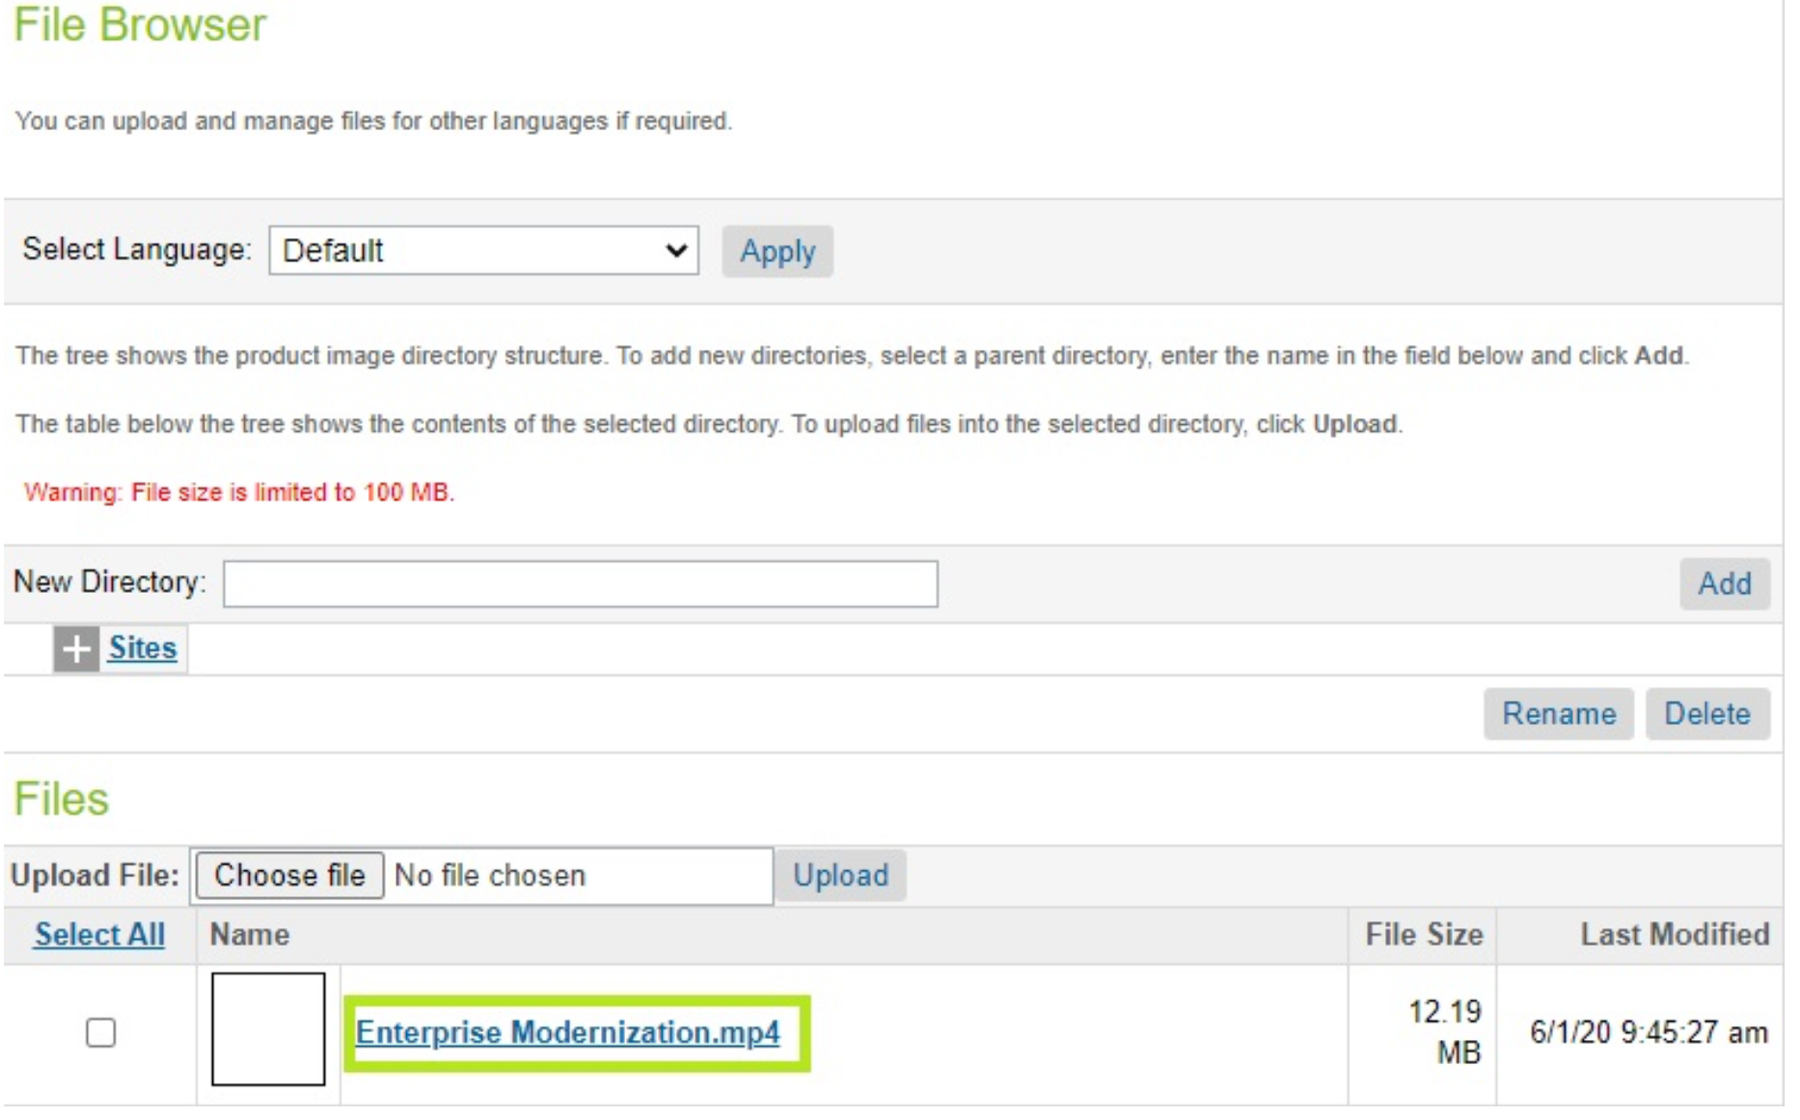
- In the dialog that appears, select the video file:
Select Video Dialog - Click the select option next to Thumbnail field, and a similar popup dialog will appear where y'all can select the thumbnail file.
- Click the select option side by side to Affiche field, and a similar popup dialog will appear where you can select the poster file.
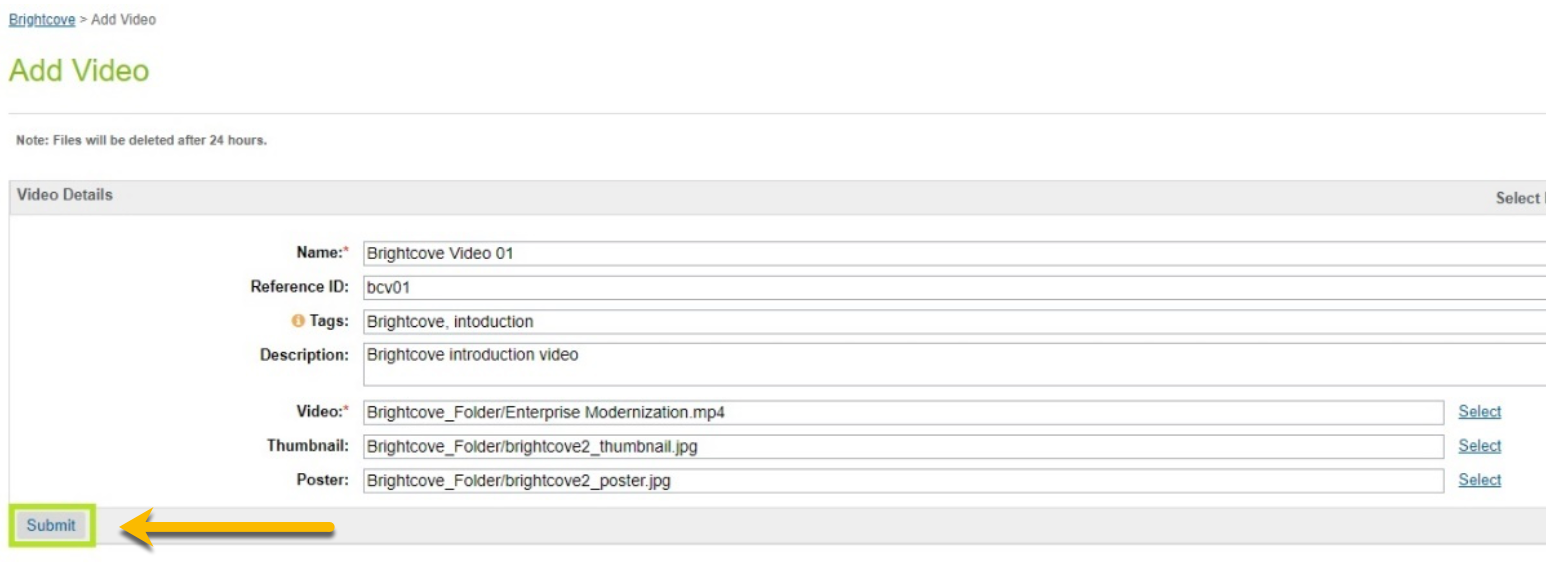
- Submit the grade to initiate the ingestion process:
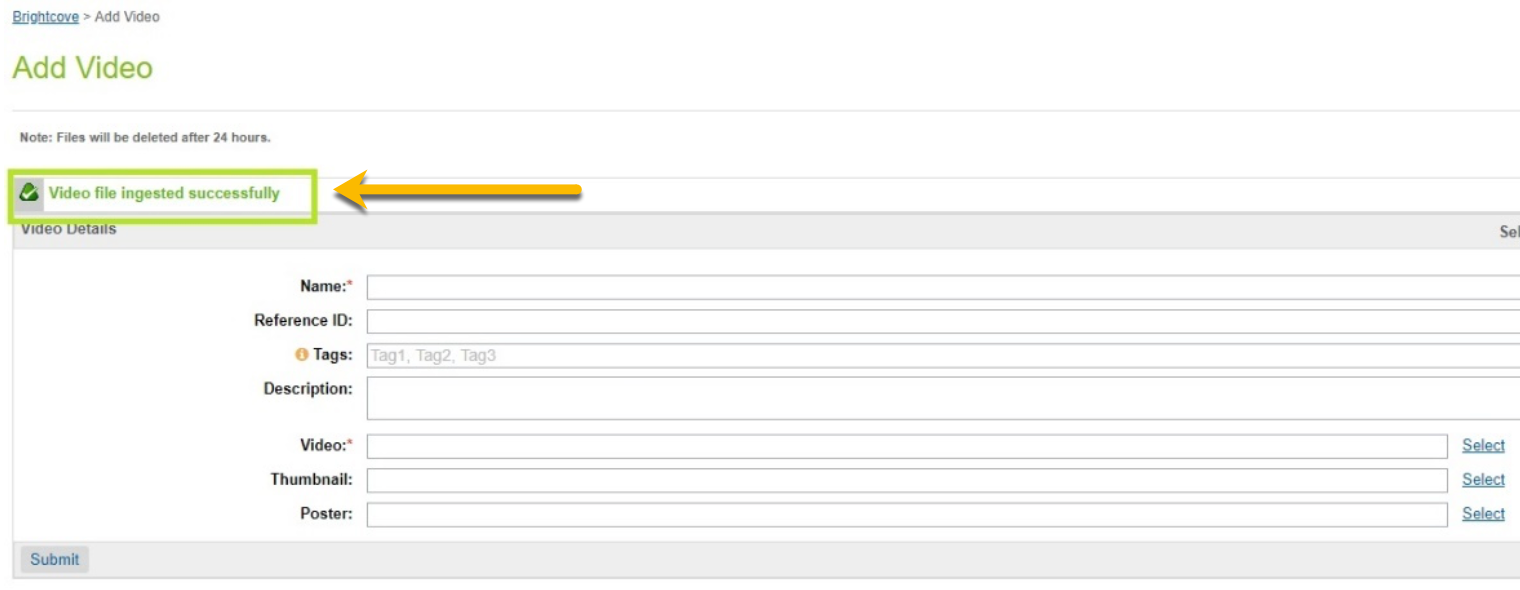
Submit Video Ingest Form - Validate the success message on the grade later on submission:
Validate Video Ingest Success - You can verify that in the video was ingested successfully by logging into Brightcove Studio and navigating to the Media module:

View Video in Studio - You lot tin can also click on the video to reveal the details in guild to verify the locale code:
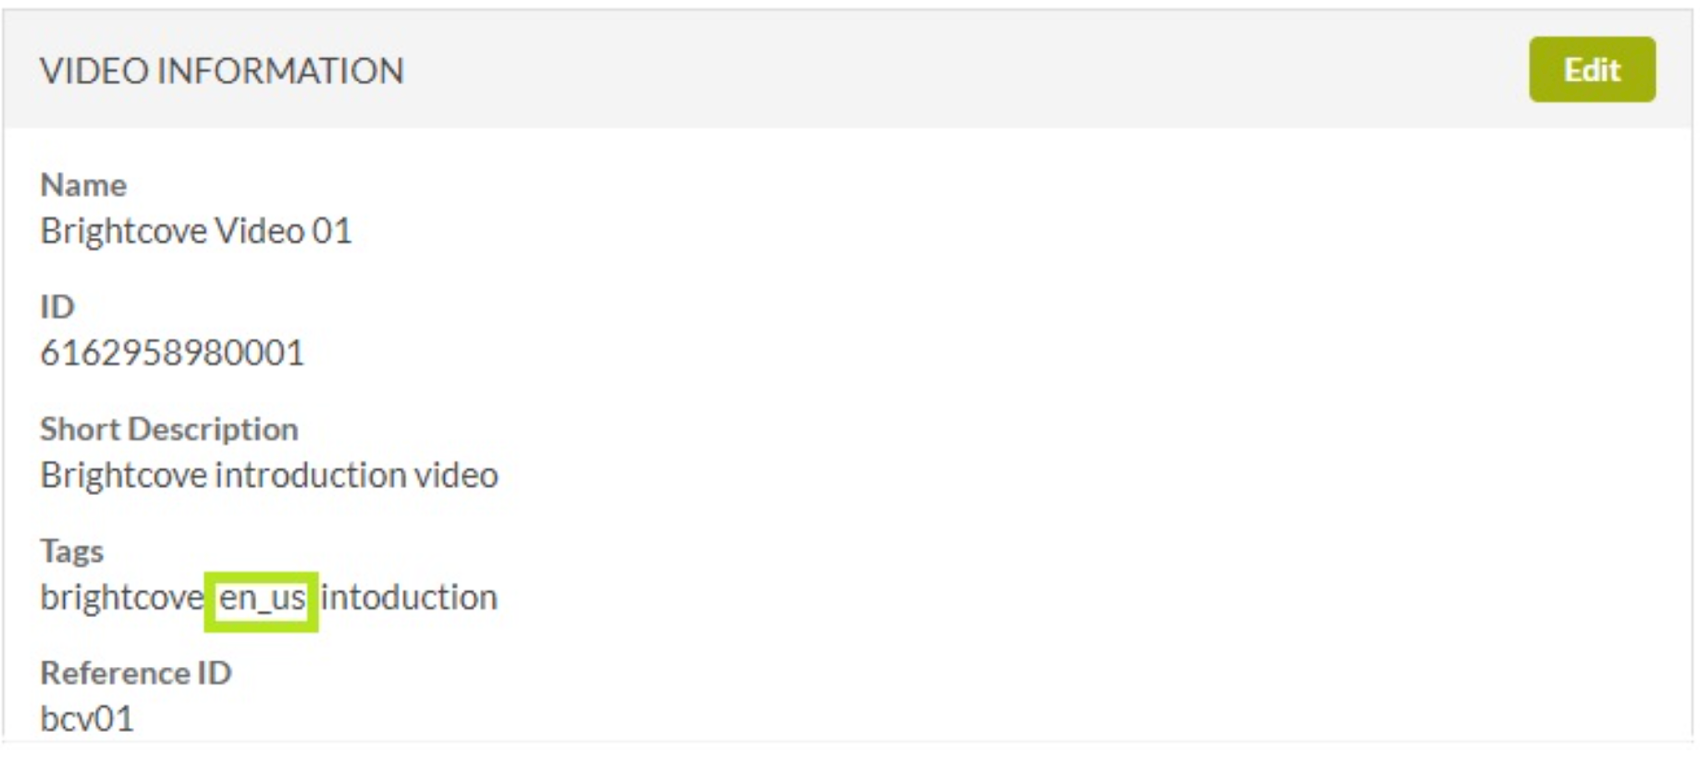
Verify Locale Code
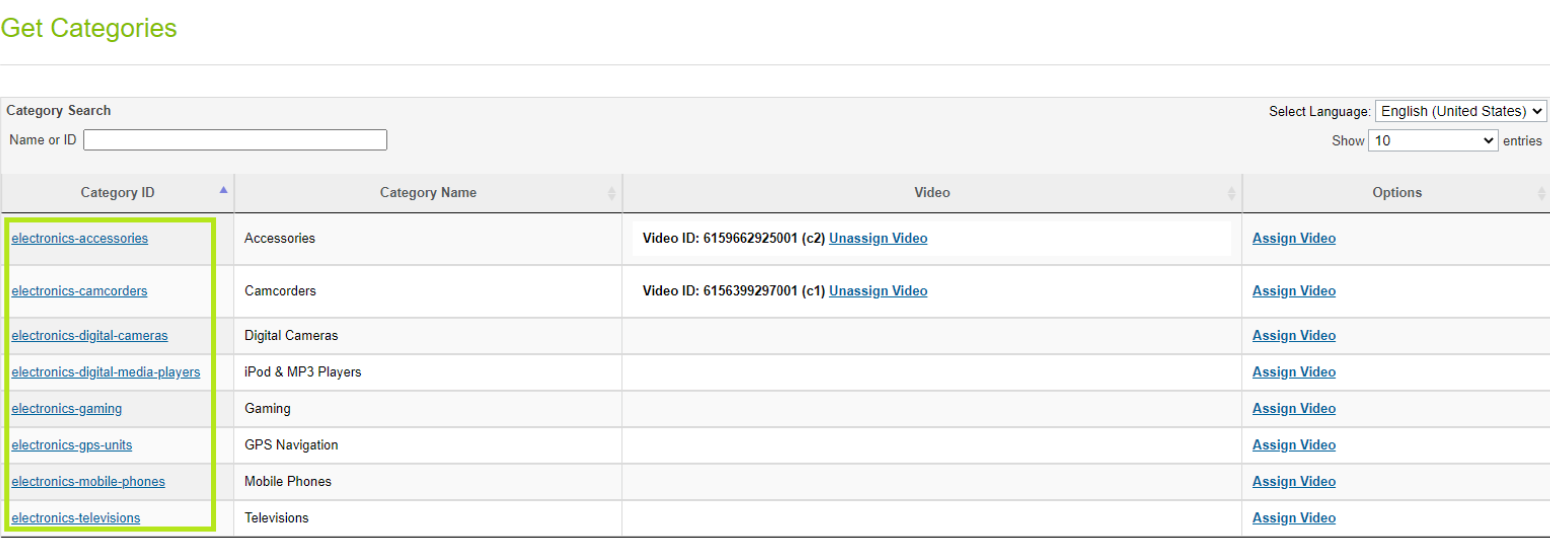
Assign Videos - Categories
First we volition expect at the steps for assigning videos to categories.
Assign Videos to Categories
- Navigate to Merchant Tools -> Brightcove -> Assign Video (Categories).
- Videos are assigned to locales.
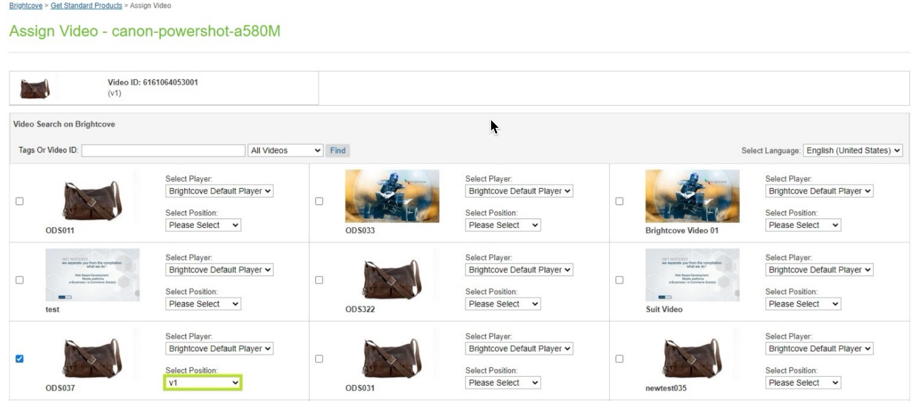
- Click Assign Video option to assign one or more videos.
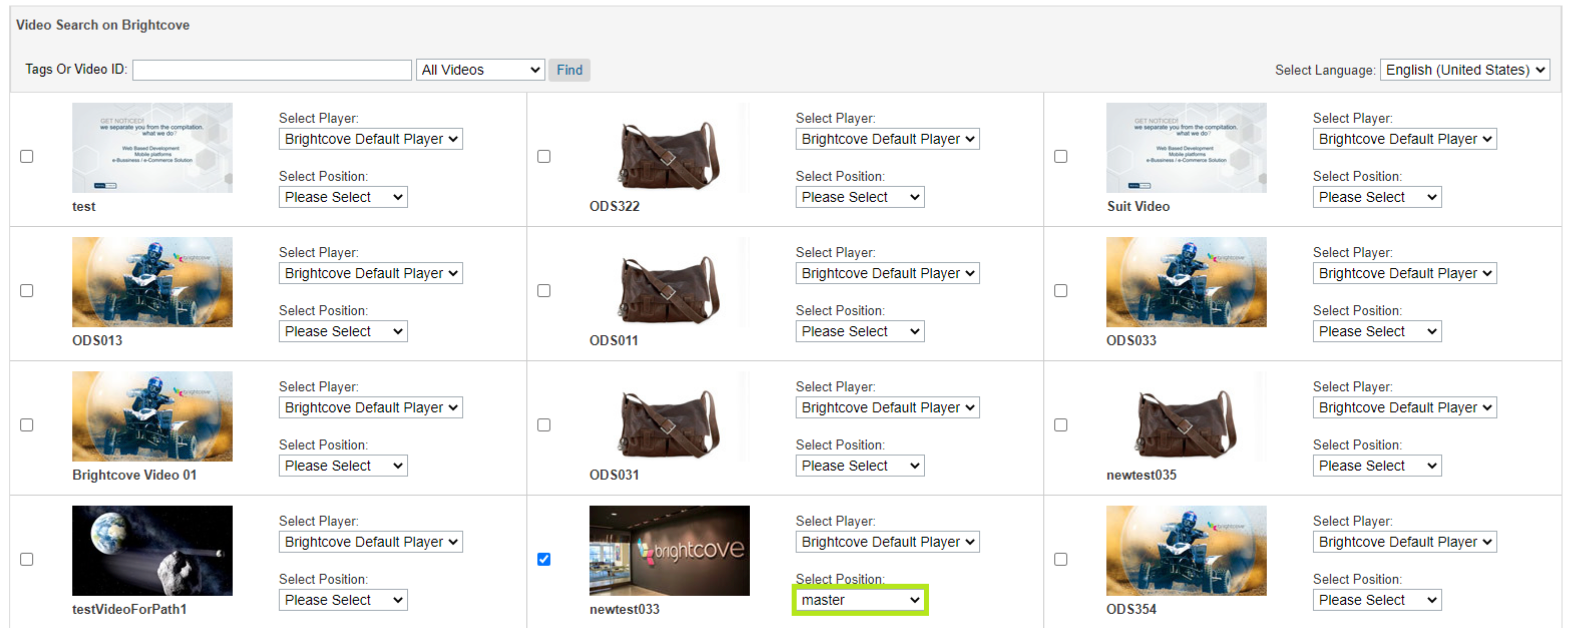
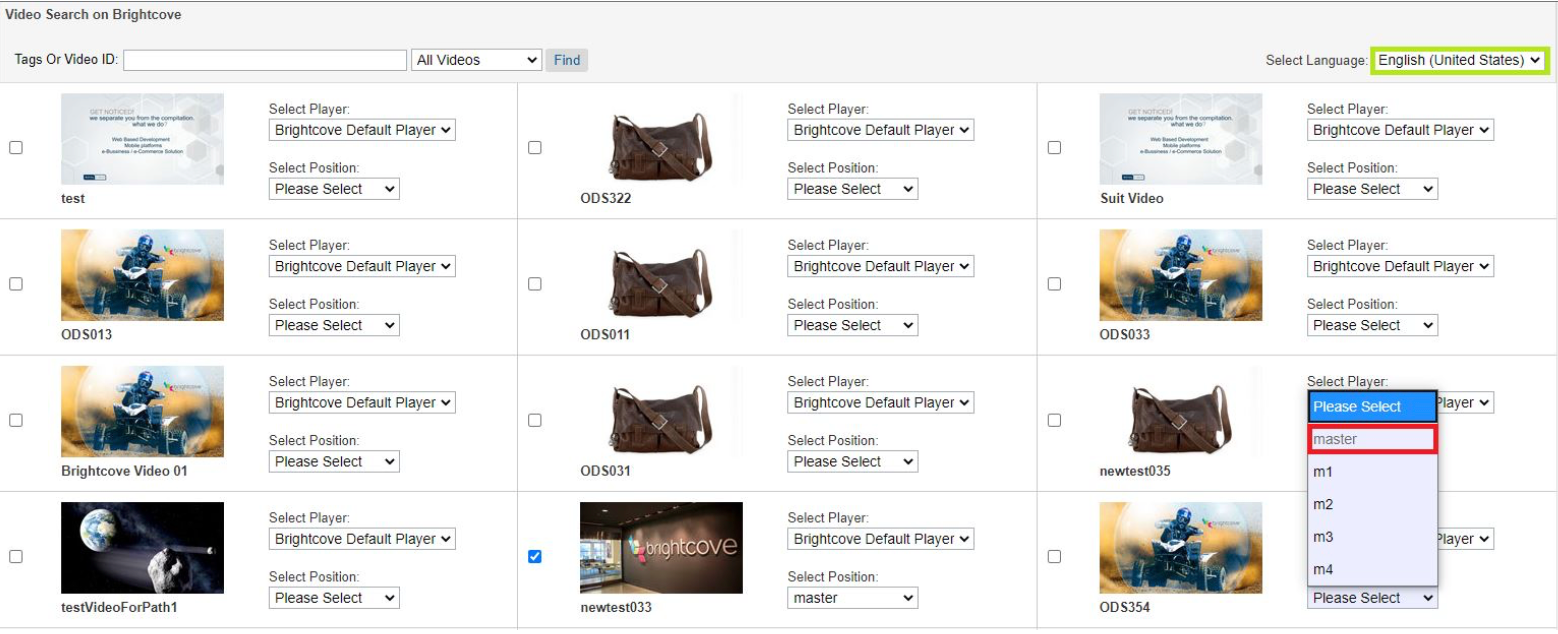
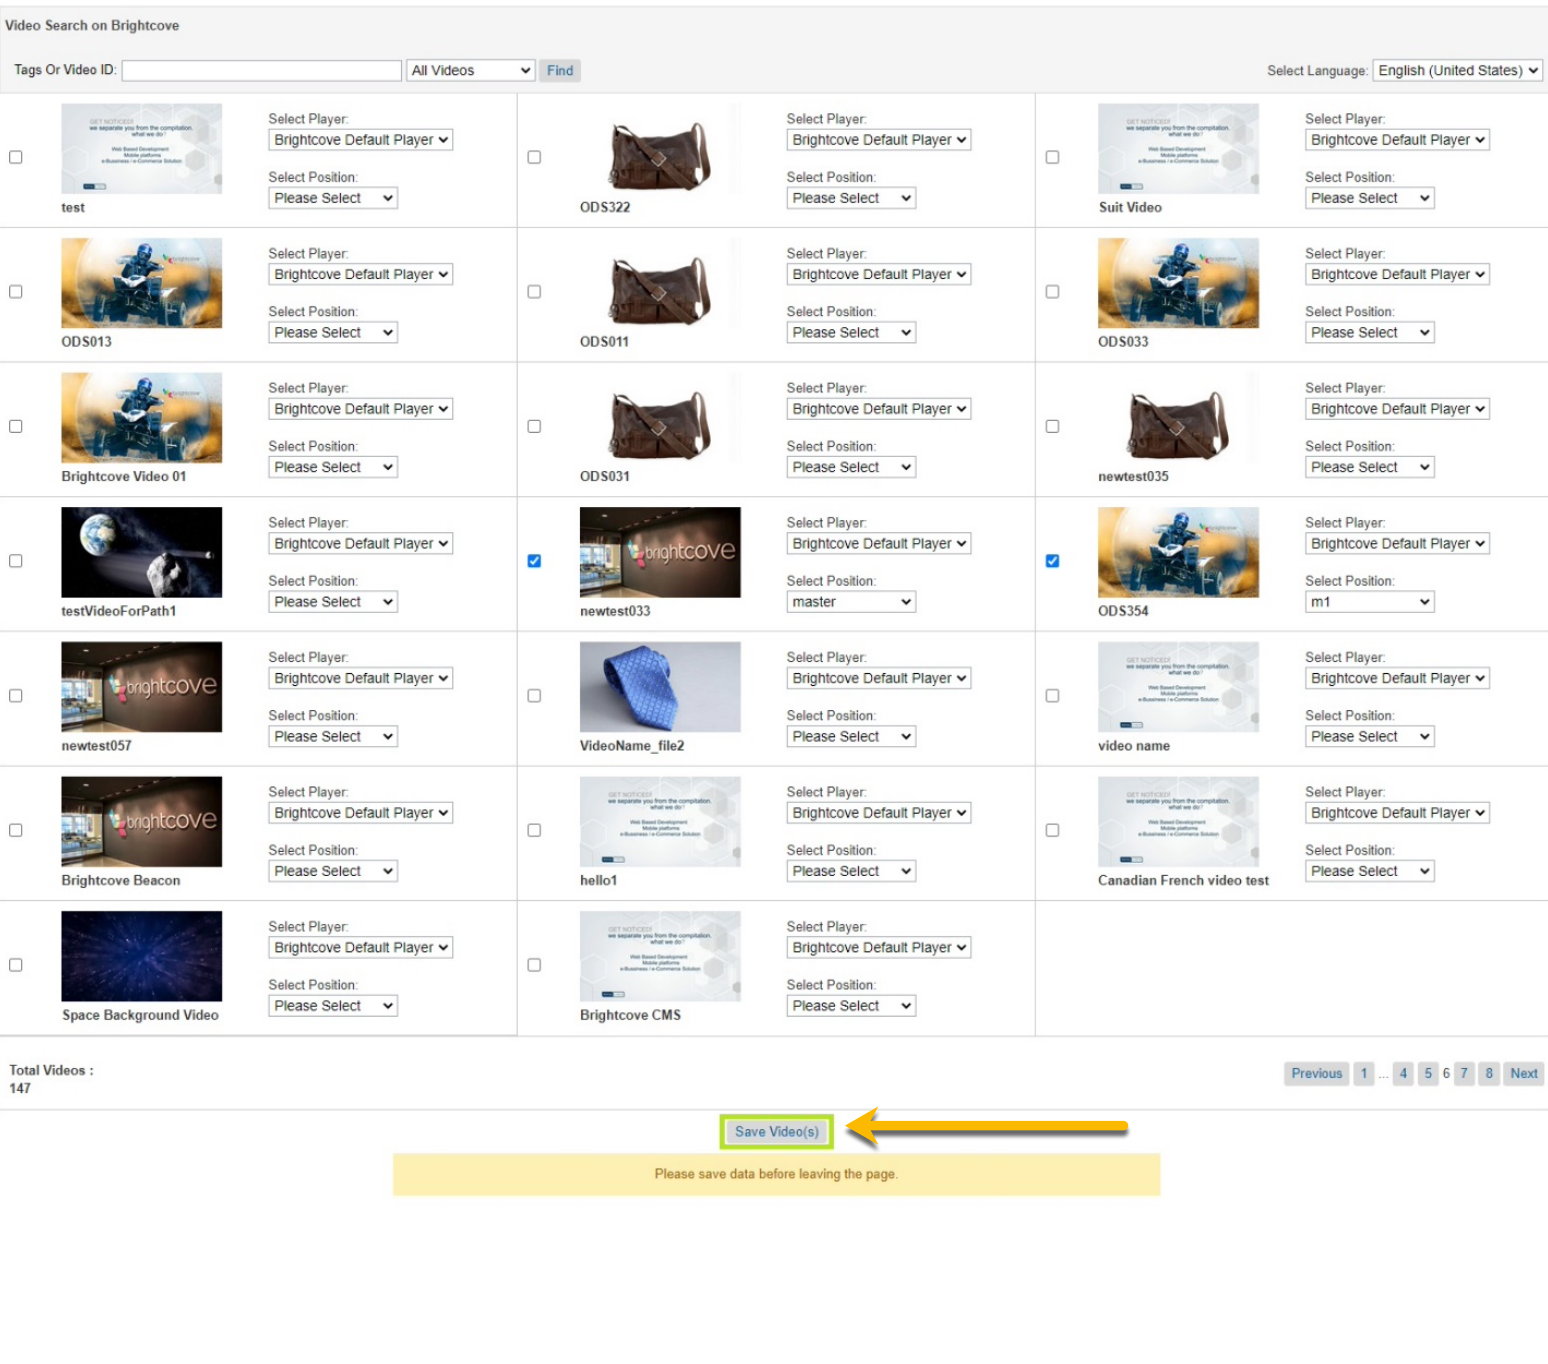
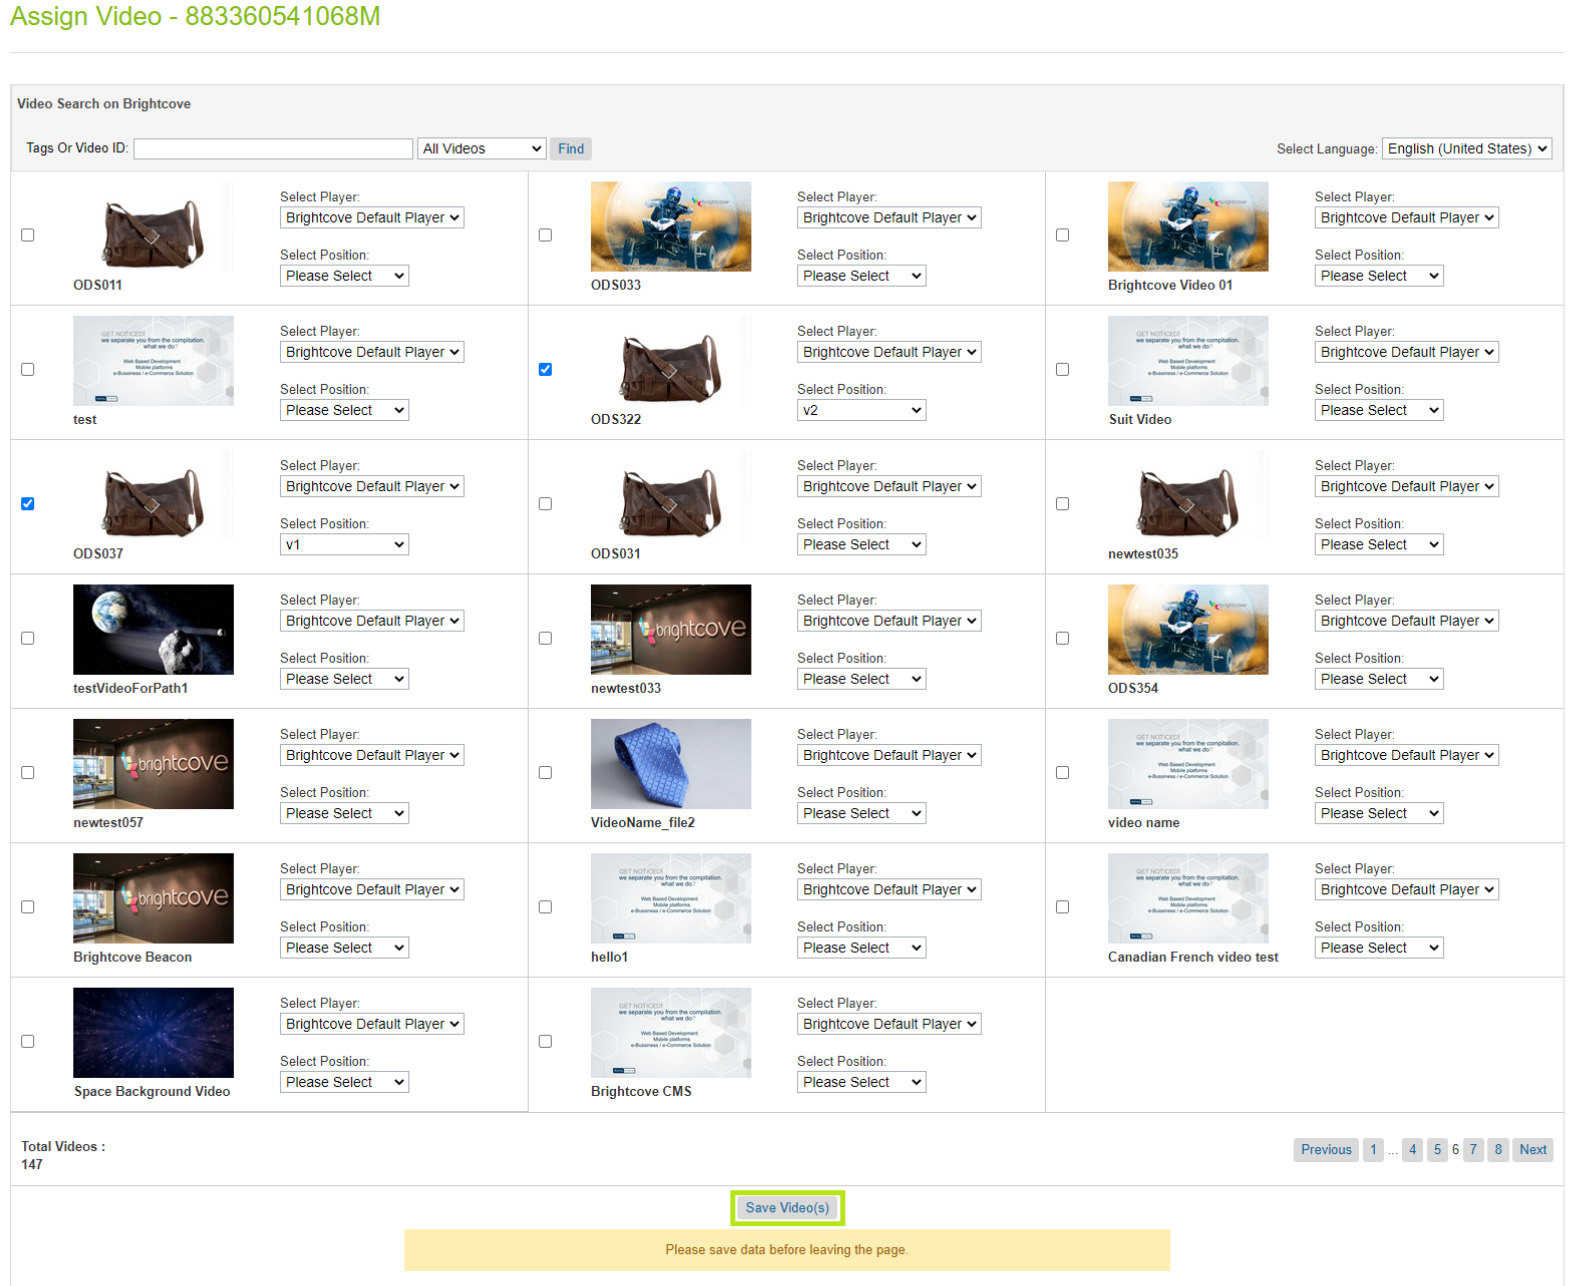
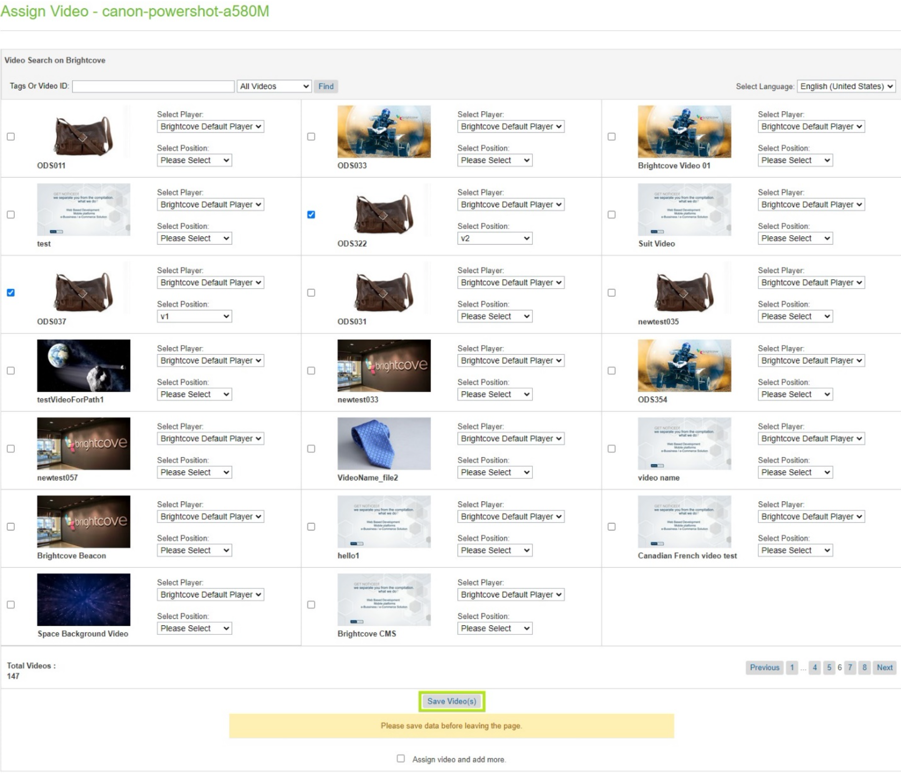
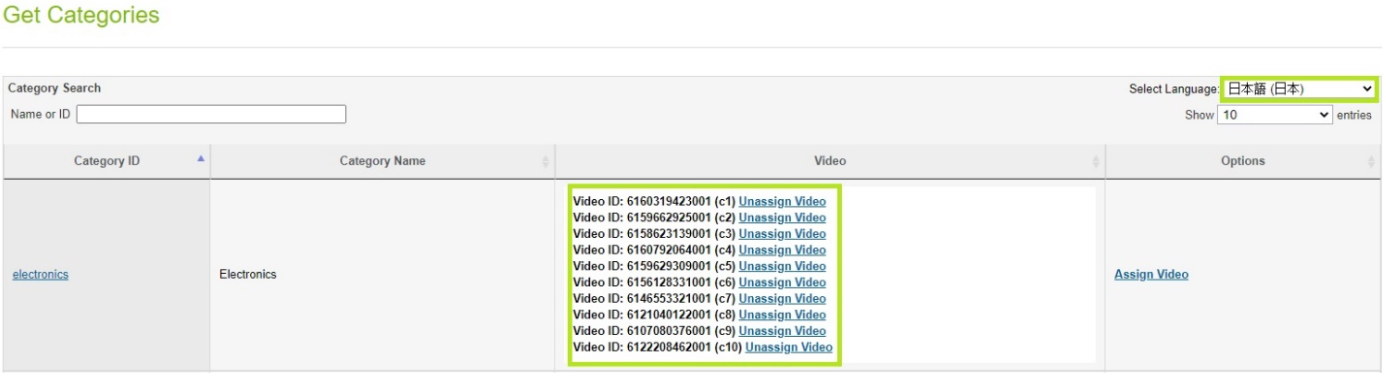
- Already assigned videos volition announced as selected on the assign video grid:
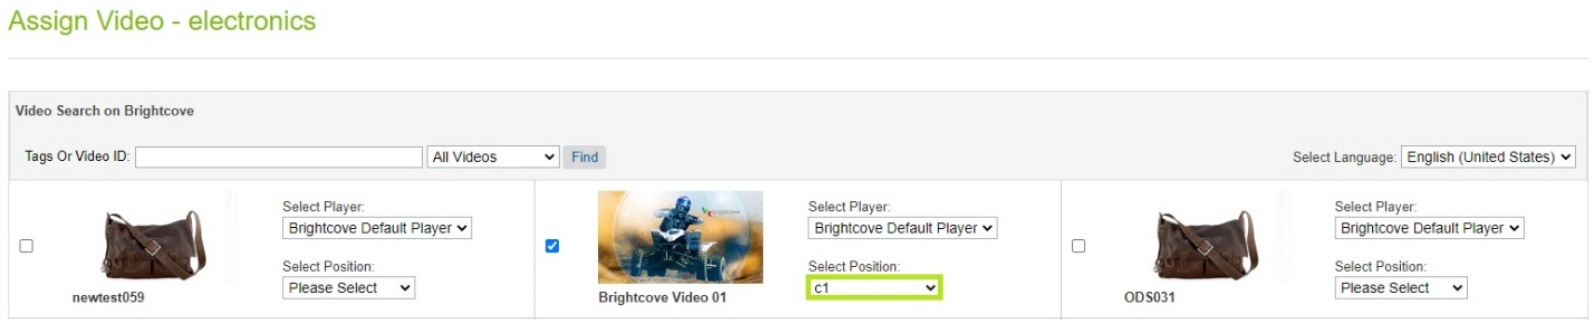
Assigned Videos - Assigned slot cannot be used for the other videos for aforementioned locale:
Assigned Video Slots - Players and slots tin can be changed by using the respective dropdowns available in each video tile.
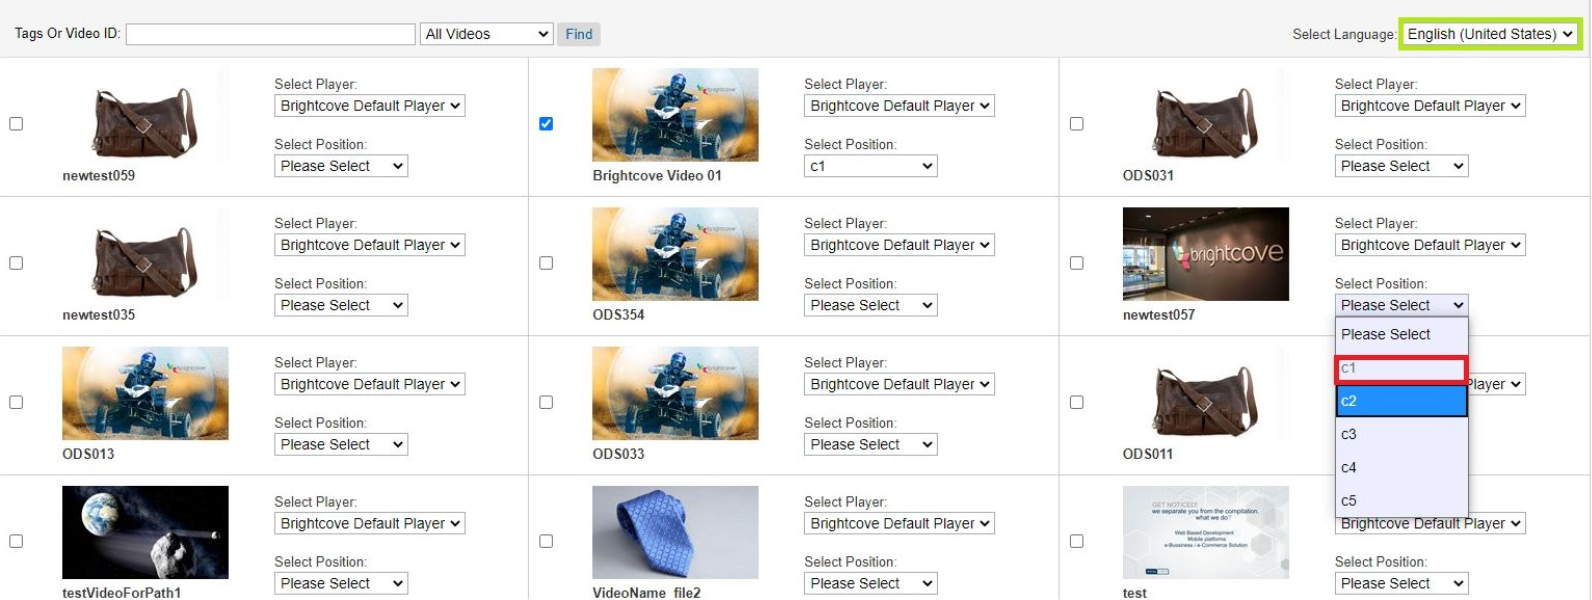
- Select another video with the different slot.
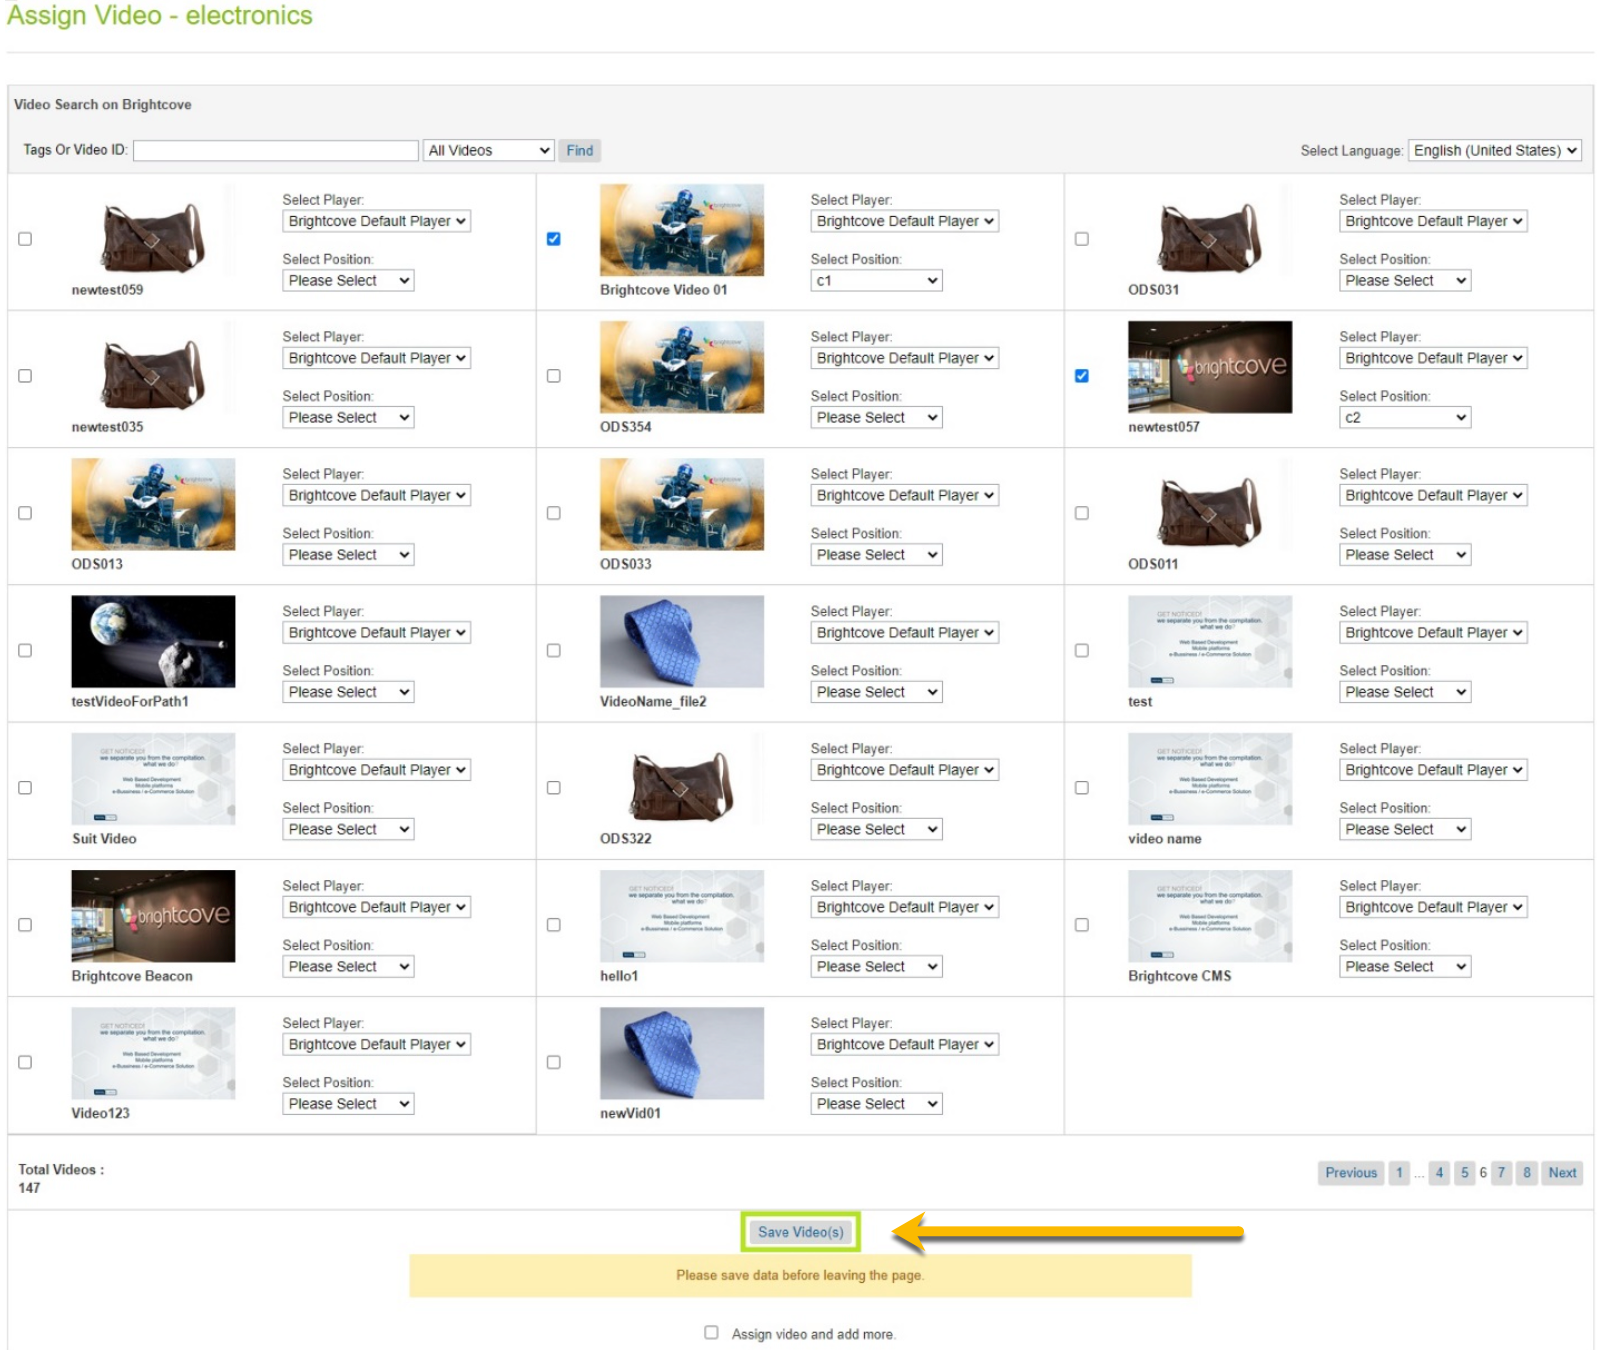
- Click the Save Video push button to assign the selected videos:
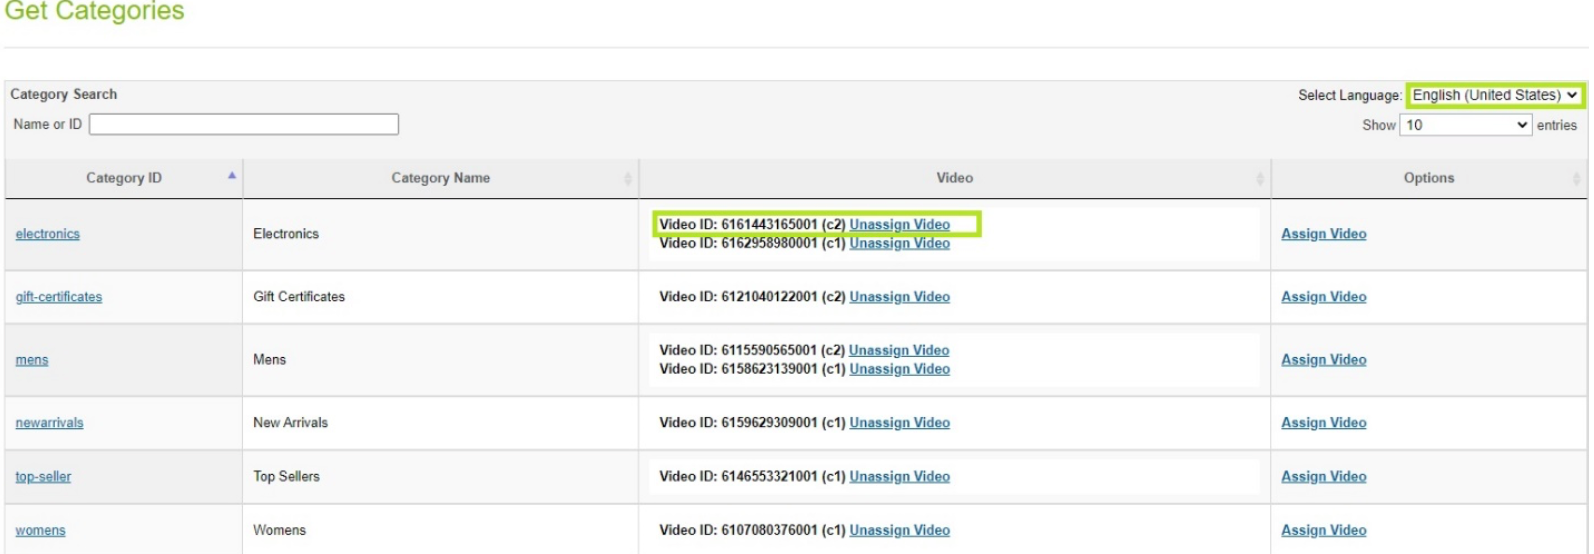
Salvage Video Assignment - Verify the assigned video and the slot:
Verify Video Assignment - Verify the data in category object.
- Navigate to Merchant Tools -> Catalogs.
- Select the itemize.
- Select the category/sub-category.
- Select Edit.
- Select Category Attributes.
- Scroll down to the Brightcove section:

Brightcove Category Attributes - To assign videos to subcategories, click on the category:

Select Category - The subcategories list will appear:
Subcategories Listing - Follow steps 3-16 to assign videos to subcategories.
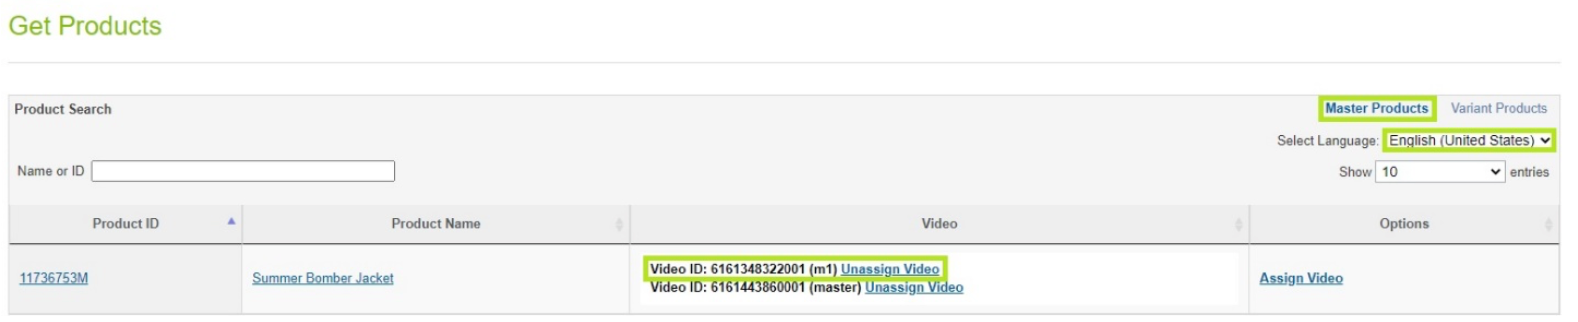
Assign videos to Main Products
- Navigate to Merchant Tools -> Brightcove -> Assign Video (Products).
- Videos are assigned to locales.
- Click Assign Video choice to assign one or more videos.
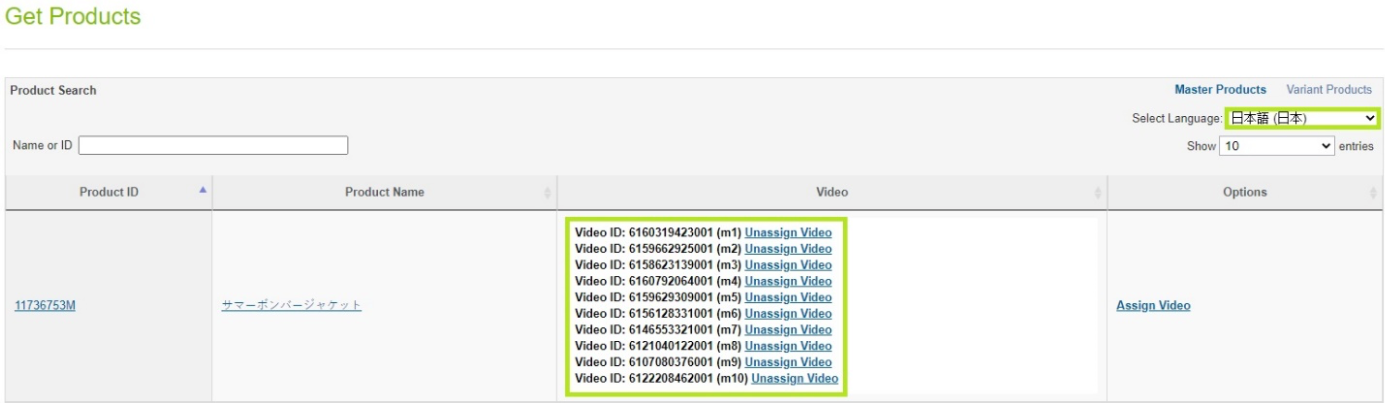
- Already assigned videos volition appear as selected on the assign video filigree:
Assigned Videos - Assigned slot cannot be used for the other videos for same locale:
Assigned Video Slots - Players and slots can be changed past using the respective dropdowns available in each video tile.
- Select another video with the unlike slot.
- Click the Save Video button to assign the selected videos:
Save Video Assignment - Verify the assigned video and the slot.
Verify Video Assignment - Verify the data in category object.
- Navigate to Merchant Tools -> Products.
- Search the product ID.
- Select the product.
- Select General.
- Scroll down to the Brightcove section:

Product Details Brightcove Section
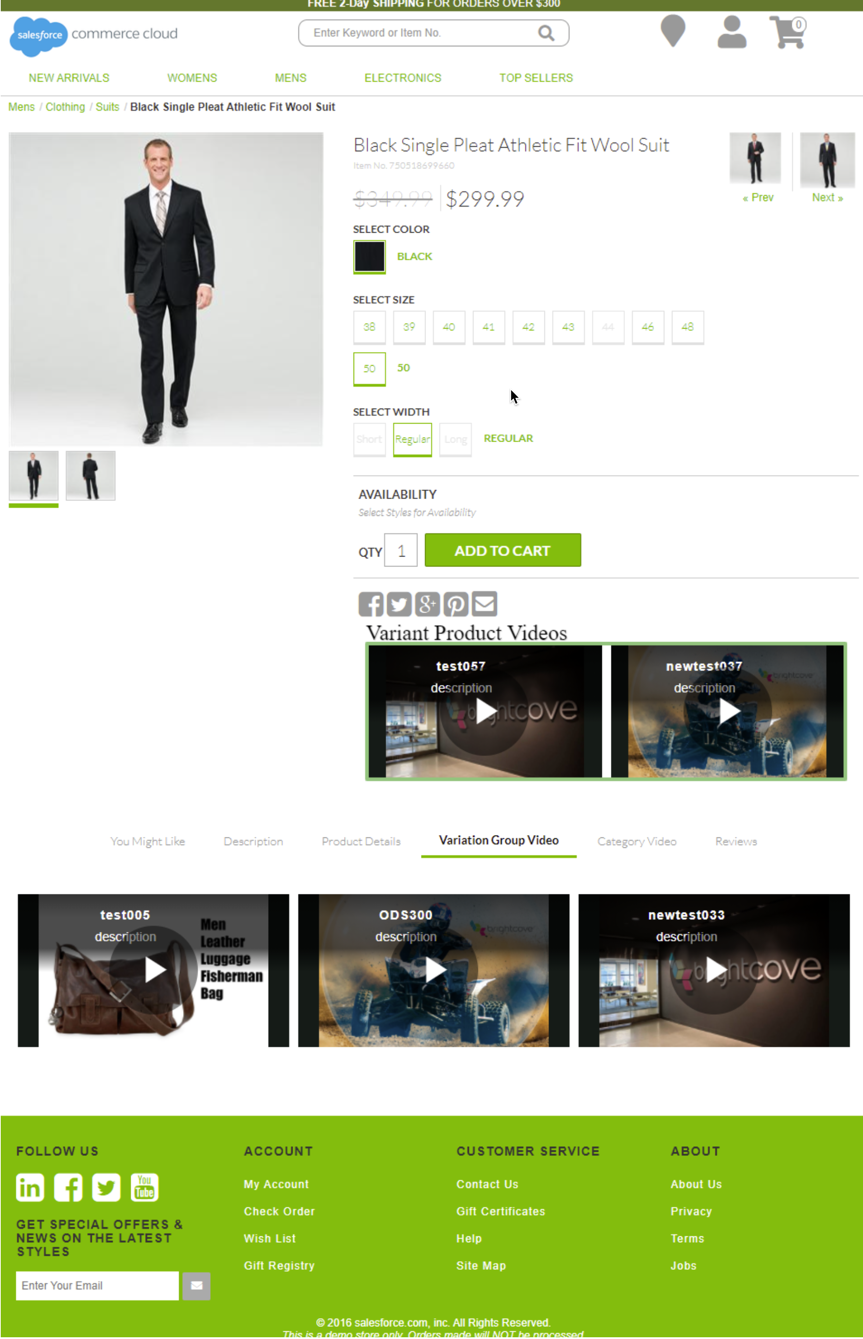
Assign videos to Variant Products
- Navigate to Merchant Tools -> Brightcove -> Assign Video (Products).
- Click on the Product ID
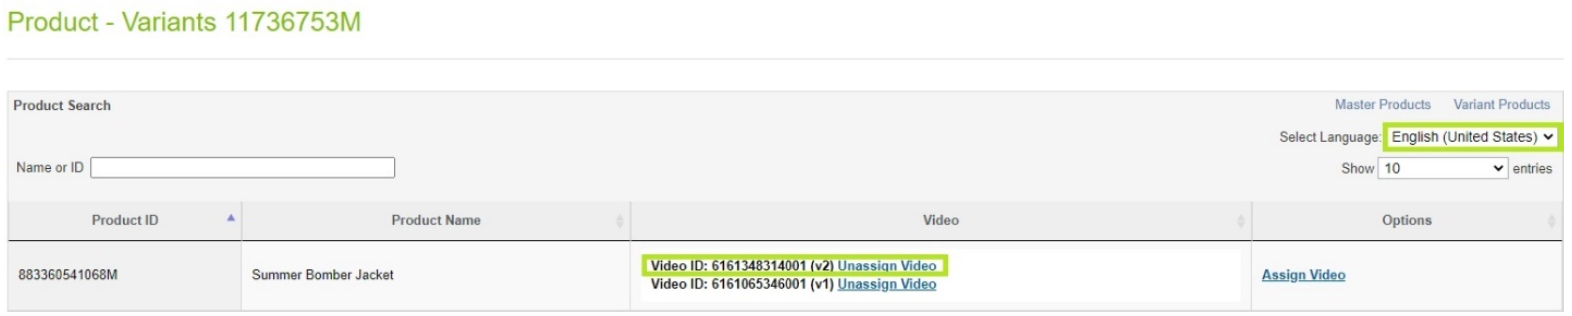
- A list of variants for the selected master will appear:
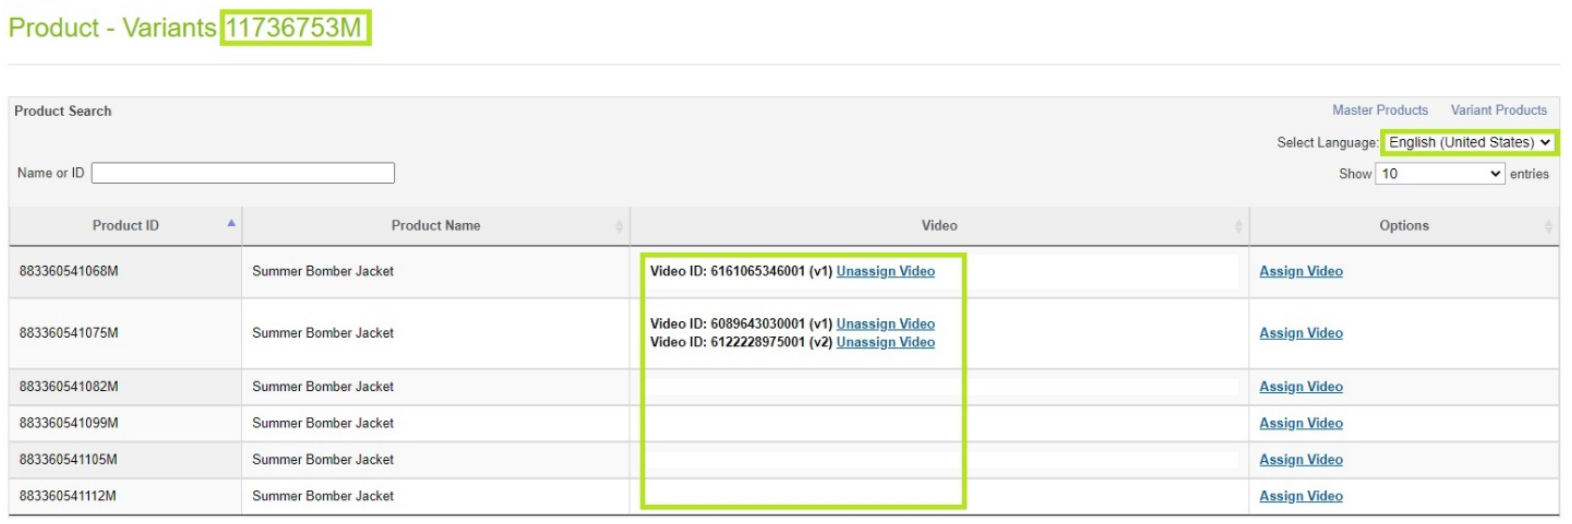
Production Variants Listing - Videos are assigned to locales.
- Click Assign Video option to assign one or more videos.
- Already assigned videos will appear as selected on the assign video filigree:
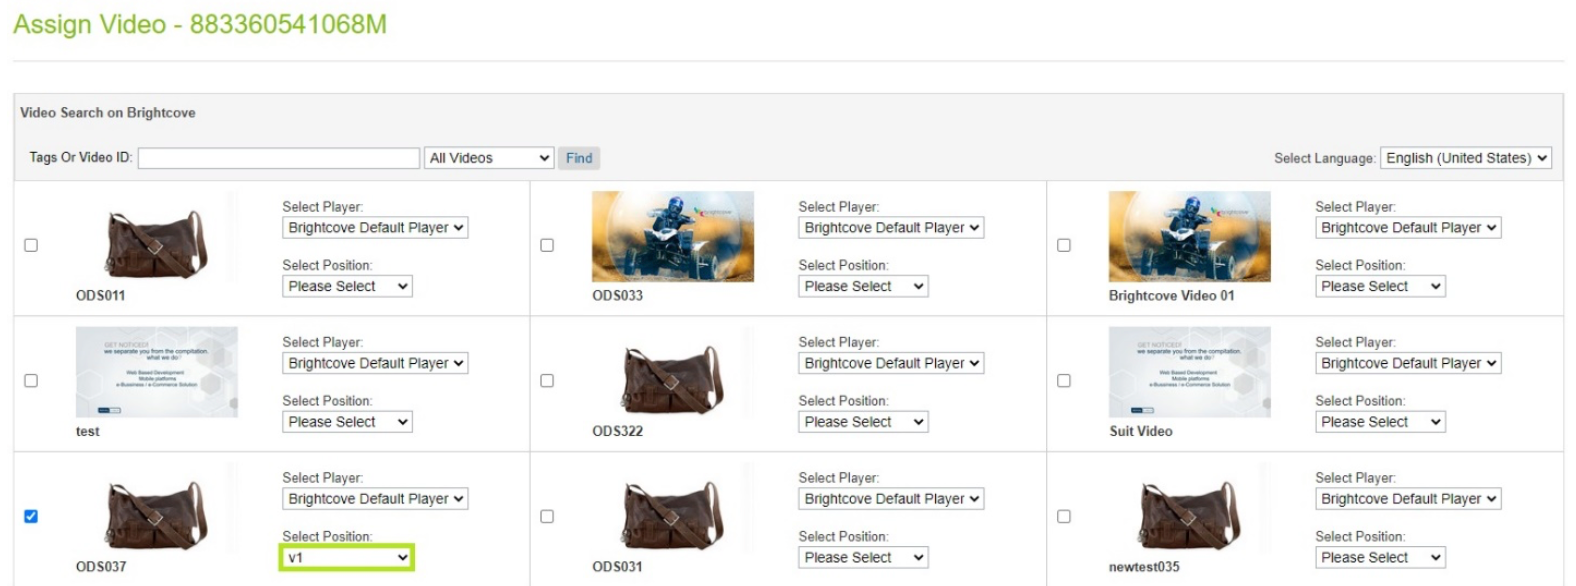
Assigned Videos - Assigned slot cannot be used for the other videos for same locale:
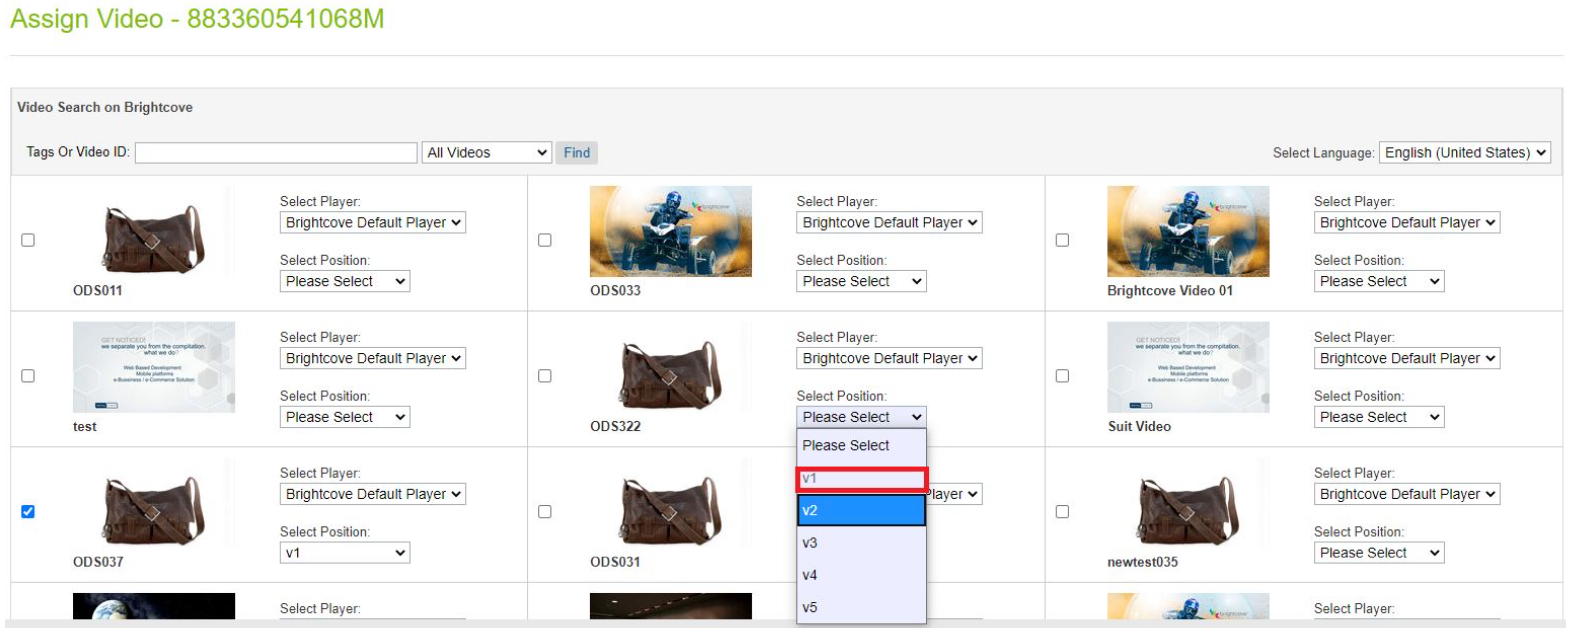
Assigned Video Slots - Players and slots tin can exist inverse by using the respective dropdowns available in each video tile.
- Select another video with the different slot.
- Click the Salve Video button to assign the selected videos:
Save Video Assignment - Verify the assigned video and the slot.
Verify Video Assignment - Verify the data in category object.
- Navigate to Merchant Tools -> Products.
- Search the product ID.
- Select the product.
- Select General.
- Scroll down to the Brightcove section:
Product Details Brightcove Section - We tin can get a list of all the Variants assigned to the catalog for the Site.
- Navigate to Merchant Tools -> Brightcove -> Assign Video (Products).
- Select Variant Products
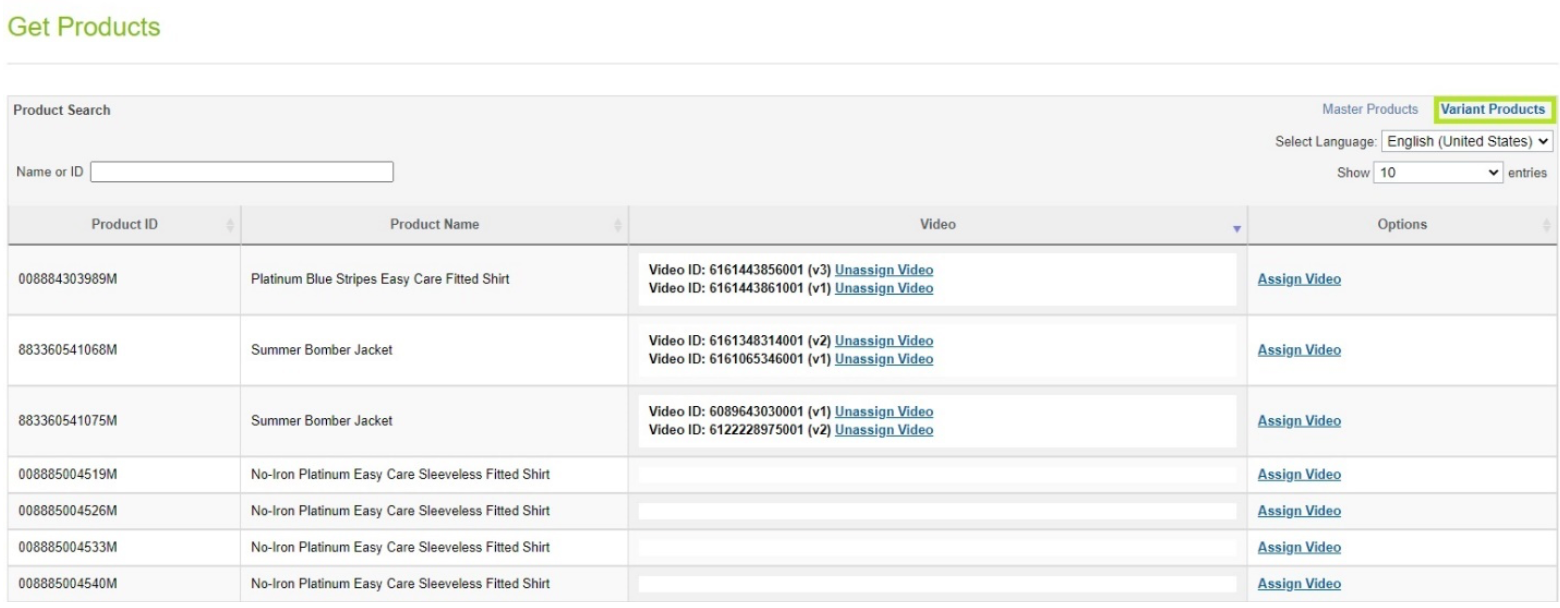
Variant Products - Follow the steps from five to 17.
Assign videos to Standard Products
- Navigate to Merchant Tools -> Brightcove -> Assign Video (Standard Products).
- Videos are assigned to locales.
- Click Assign Video choice to assign one or more than videos.
- Already assigned videos will announced as selected on the assign video grid:
Assigned Videos - Assigned slot cannot be used for the other videos for same locale:
Assigned Video Slots - Players and slots can be changed by using the respective dropdowns bachelor in each video tile.
- Select another video with the different slot.
- Click the Salve Video push to assign the selected video(s):
Save Video Assignment - Verify the assigned video and the slot.

Verify Video Assignment - Verify the data in production object.
- Navigate to Merchant Tools -> Products.
- Search the product ID.
- Select the production.
- Select General.
- Scroll downwards to the Brightcove section:

Product Details Brightcove Section
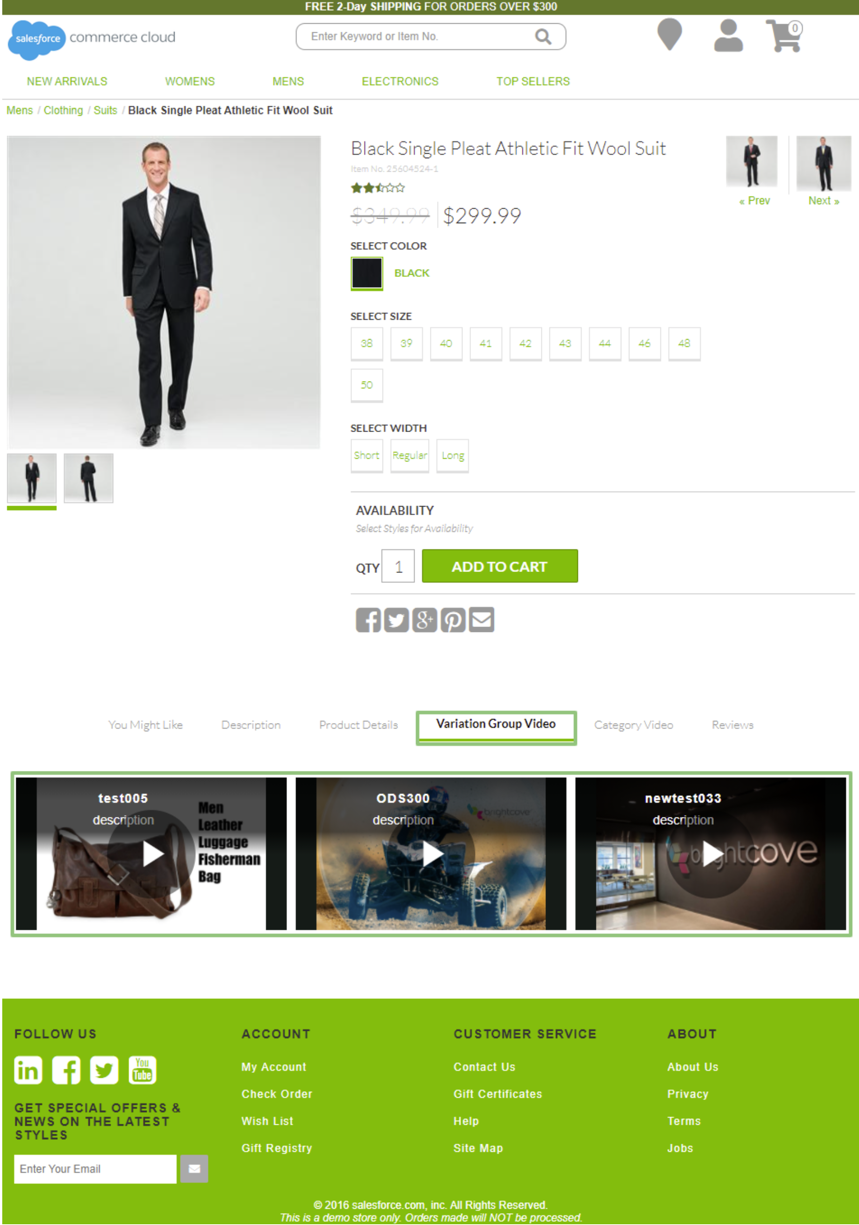
Assign videos to Variation Groups
- Navigate to Merchant Tools -> Brightcove -> Assign Video (Variation Groups).
- Videos are assigned to locales.
- Click Assign Video option to assign one or more than videos.
- Already assigned videos will appear as selected on the assign video filigree:
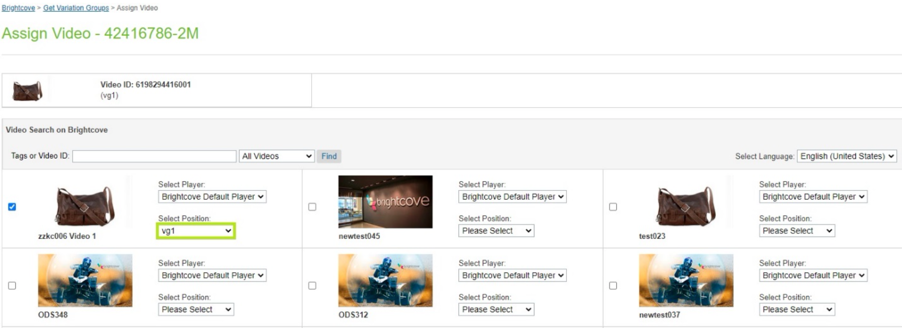
Assigned Videos - Assigned slot cannot be used for the other videos for same locale:
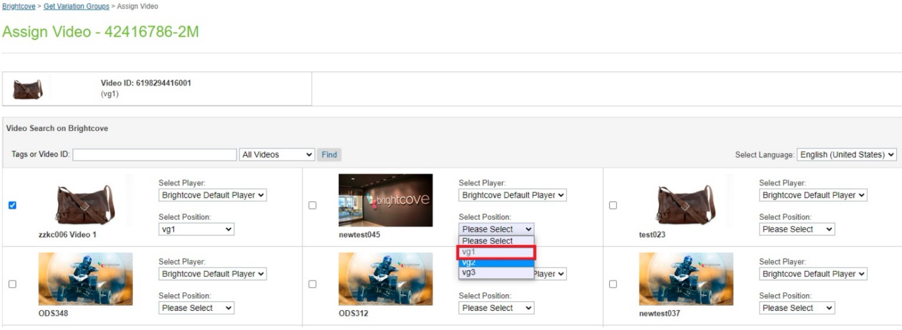
Assigned Video Slots - Players and slots can exist changed by using the corresponding dropdowns available in each video tile.
- Select another video with the different slot.
- Click the Save Video button to assign the selected video(s):
Save Video Assignment - Verify the assigned video and the slot.

Verify Video Consignment - Verify the data in product object.
- Navigate to Merchant Tools -> Products.
- Search the product ID.
- Select the production.
- Select General.
- Gyre down to the Brightcove section:
Product Details Brightcove Department - We can navigate to assigned variants of the Variation Grouping.
- Select Variation Grouping ID.

Variation Group Videos - A list of variants for the selected variation group volition appear.

List of Variants
Assign videos to Product Sets
- Navigate to Merchant Tools -> Brightcove -> Assign Video (Product Sets).
- Videos are assigned to locales.
- Click Assign Video option to assign one or more than videos.
- Already assigned videos will appear as selected on the assign video grid:
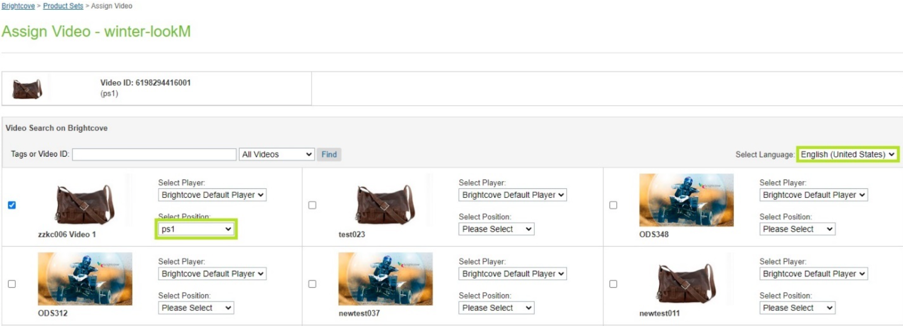
Assigned Videos - Assigned slot cannot be used for the other videos for same locale:
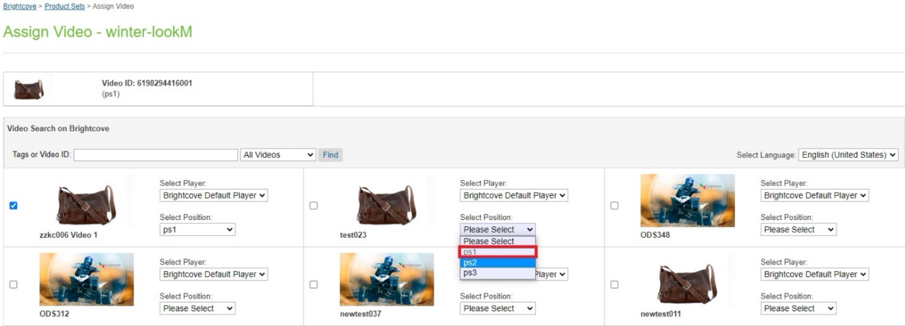
Assigned Video Slots - Players and slots can be changed by using the respective dropdowns available in each video tile.
- Select another video with the dissimilar slot.
- Click the Save Video button to assign the selected video(southward):
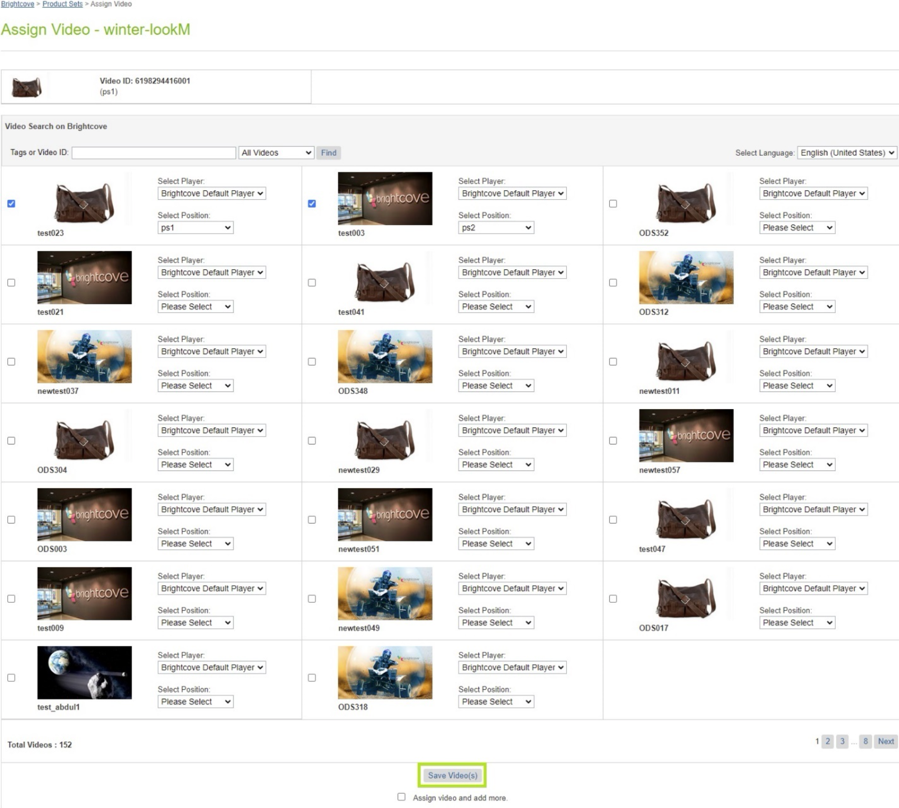
Salvage Video Consignment - Verify the assigned video and the slot.

Verify Video Consignment - Verify the data in product object.
- Navigate to Merchant Tools -> Products.
- Search the product ID.
- Select the product.
- Select General.
- Scroll downwards to the Brightcove section:
Product Details Brightcove Section - We tin can navigate to assigned products of the Product Set.
- Select Product Set ID.

Production Set Videos - A list of products for the selected Product Ready will appear.

List of Products
Assign videos to Product Bundles
- Navigate to Merchant Tools -> Brightcove -> Assign Video (Product Bundles).
- Videos are assigned to locales.
- Click Assign Video choice to assign one or more videos.
- Already assigned videos will appear equally selected on the assign video grid:

Assigned Videos - Assigned slot cannot be used for the other videos for same locale:
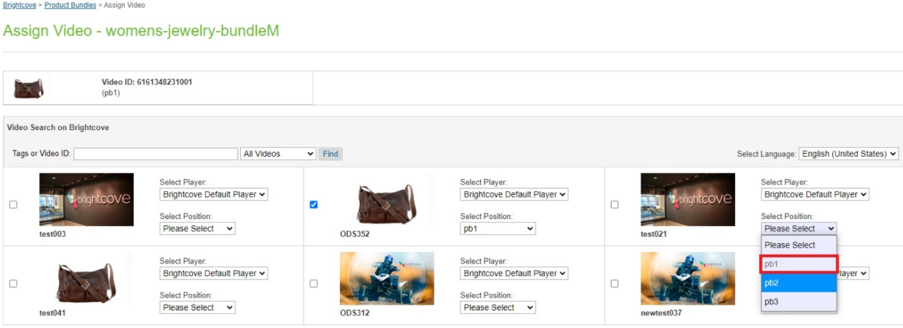
Assigned Video Slots - Players and slots can be changed by using the respective dropdowns available in each video tile.
- Select another video with the different slot.
- Click the Save Video push to assign the selected video(due south):
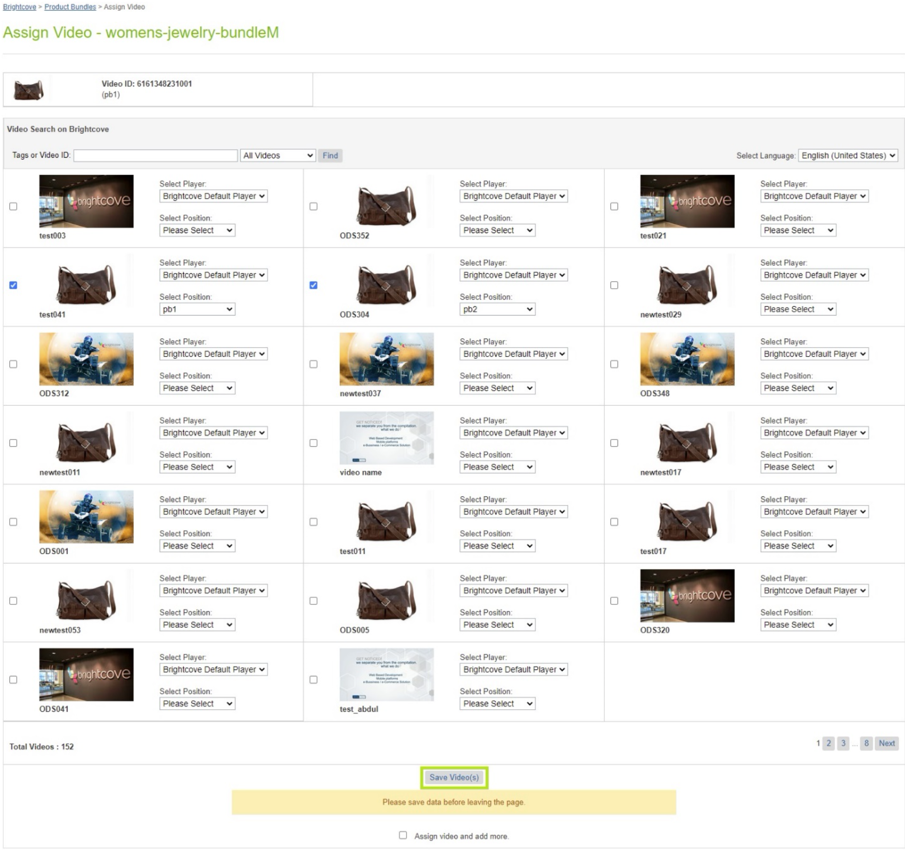
Save Video Assignment - Verify the assigned video and the slot.

Verify Video Consignment - Verify the information in production object.
- Navigate to Merchant Tools -> Products.
- Search the product ID.
- Select the product.
- Select Full general.
- Scroll down to the Brightcove section:
Product Details Brightcove Section - We can navigate to assigned products of the Product Bundle.
- Select Product Bundle ID.

Product Bundle Videos - A list of products for the selected Product Bundle will appear.
Listing of Products
Embed Video
The embed video steps allow yous to get code to render videos on any ISML page.
- Navigate to Merchant Tools -> Brightcove -> Embed Video.
- Select the video and role player you want and click Get Lawmaking:
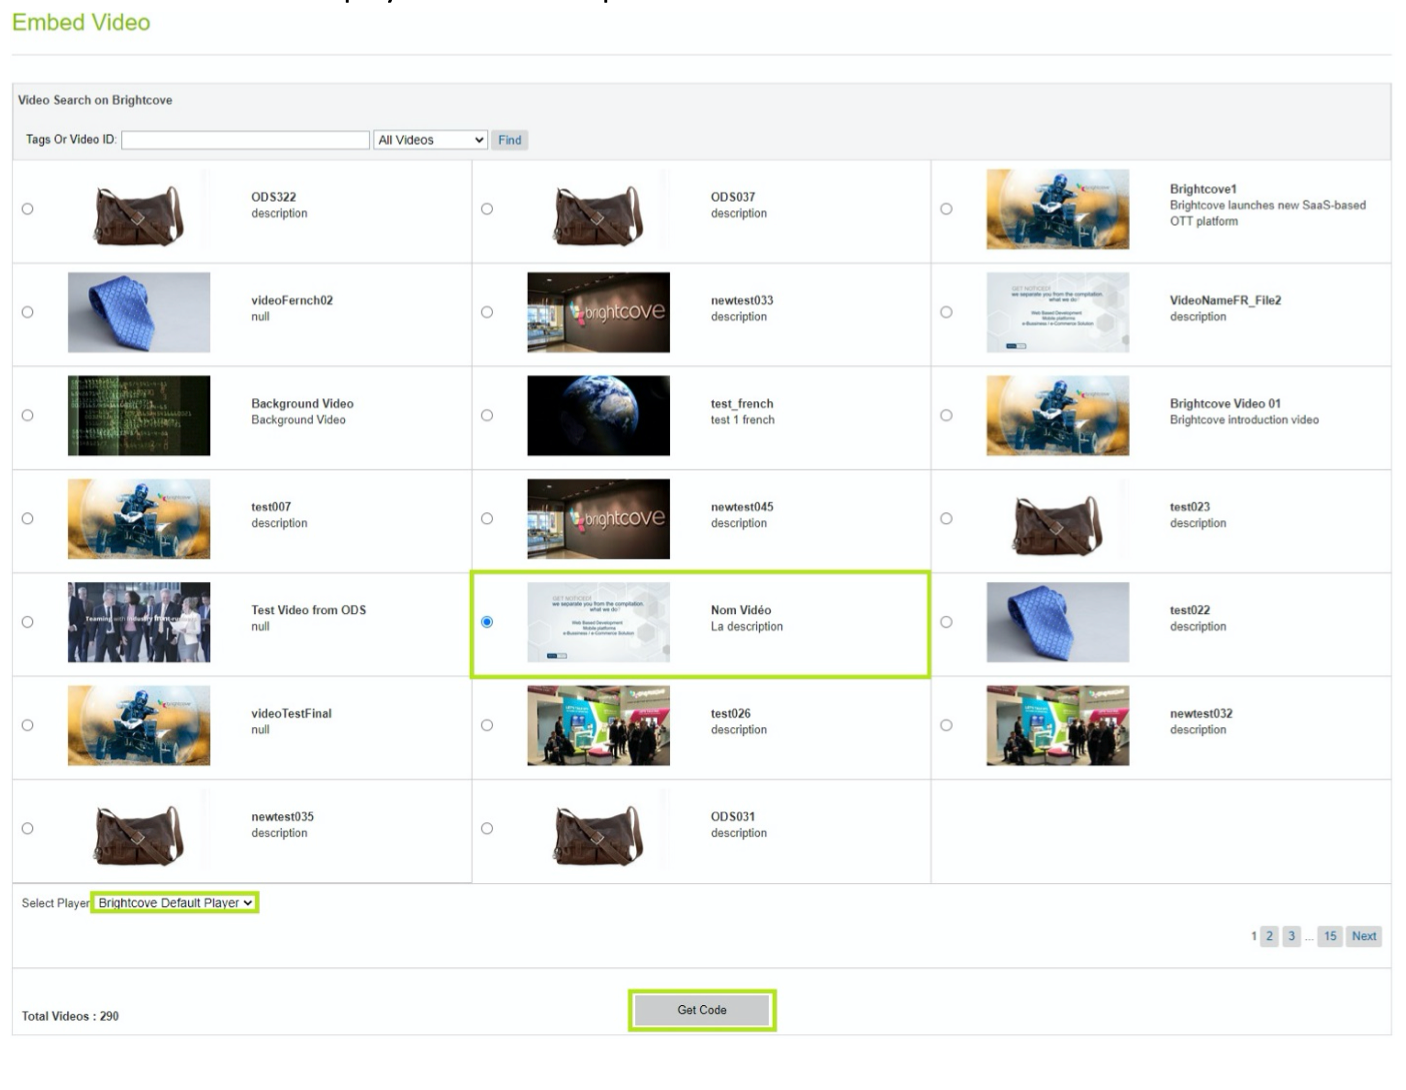
Embed Video - A popup dialog will appear with the code - select the lawmaking block, and it will exist copied to the clipboard:
Embed Code - Paste the code in content asset, content slot or in whatsoever ISML template to render video.
Bulk upload
Bulk upload allows to ingest videos in bulk quantity past uploading .csv files. The job will process the .csv file(s) and ingest the videos to the Brightcove business relationship. A sample bulkUpload file is attached in the zip file under meta directory.
- Navigate to Merchant Tools -> Brightcove -> Bulk Upload.
- Select .csv file.
- Click submit:

Majority Upload - The file will upload in Temp directory under bulkUpload folder.

Majority Upload Folder - File data:

File Data - Navigate to Assistants -> Jobs.
- Select Bulk-Upload job and click Run.
- Verify the job completion status.
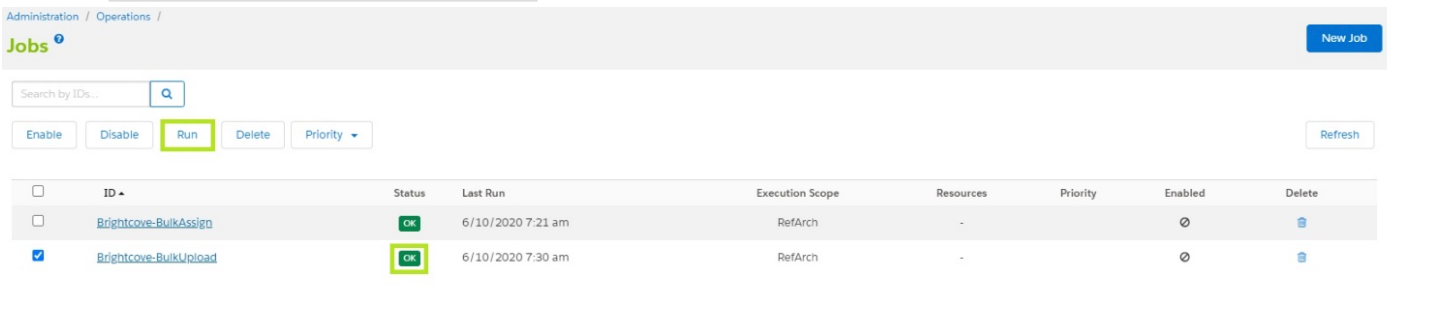
Verify Bulk Upload Completion - Verify the video object in Brightcove business relationship.
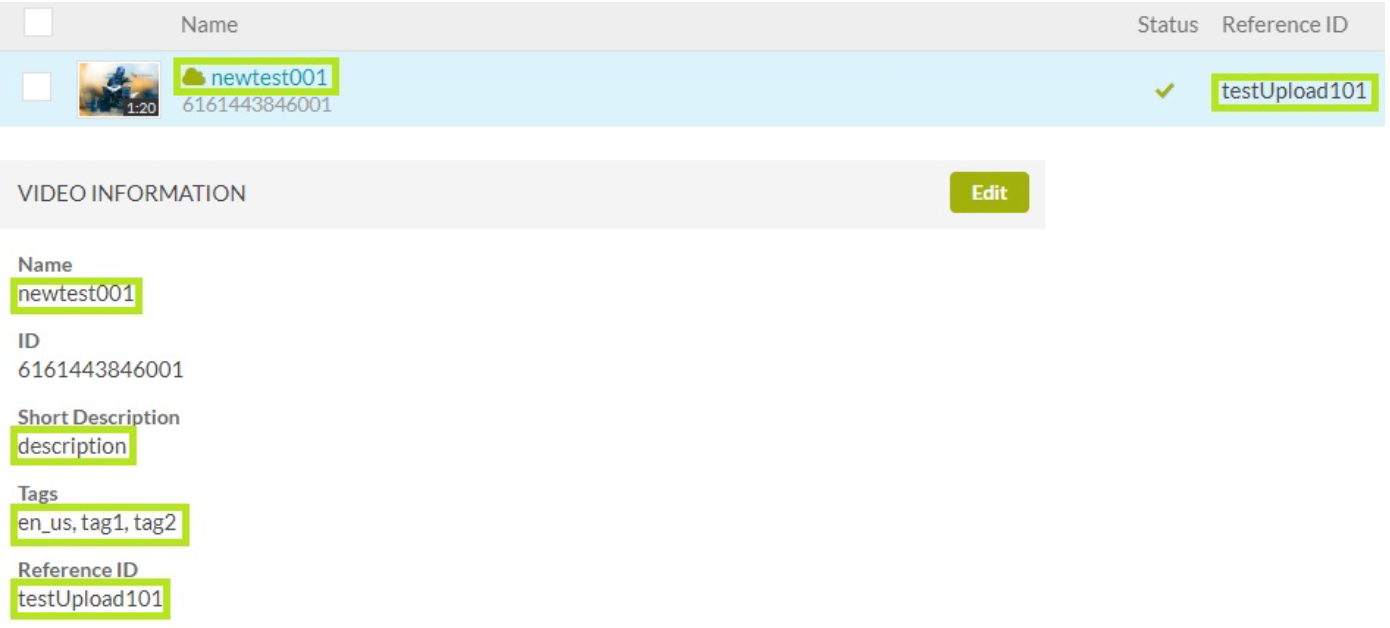
Verify Video Object in Brightcove - The file processed by Bulk-Upload task volition be moved to bulkUpload_processed binder under Temp directory.

Processed Bulk Upload File
Bulk assign
Bulk assign allows to assign video(southward) to categories, sub-categories and products in bulk quantity past uploading .csv file(south). Bulk assign allows to assign video(s) to categories, sub-categories and products in bulk quantity by uploading .csv file(s). The sample bulkAssign file(s) for category and product are attached in the zip file under the meta directory.
The job will process csv file(s) for category and product under during the same execution. The chore checks the directories for product and category, and processes the file(s).
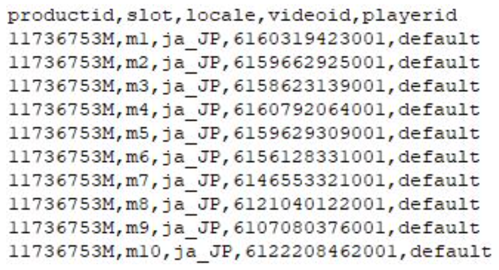
The category file information looks similar this:
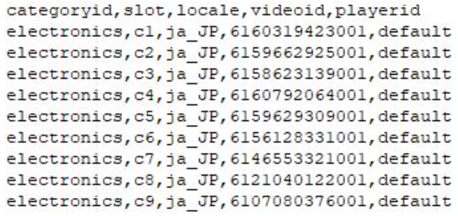
The production file information looks like this:
The task will procedure csv file(s) for category and production under the same execution. The job checks the directories for product and category and process the file(south).
Category
- Navigate to Merchant Tools -> Brightcove -> Bulk Assign.
- Select Category.
- Select .csv file.
- Click Submit:

Submit CSV File - Category - The file will upload in the Temp directory under the {SITE-ID}/bulkAssignCategory folder.

bulkassigncategory Folder - Navigate to Assistants -> Jobs.
- Select the Majority-Assign job and click Run.
- Verify the job completion status.

Job Completion Status - Bulk Assign Category - Verify the video(due south) assigned.
Verify Videos Assign - Category - The file candy by Bulk-Assign job will be moved to the bulkAssignCategory_processed folder nether the Temp directory.
Product
- Navigate to Merchant Tools -> Brightcove -> Bulk Assign.
- Select Product.
- Select .csv file.
- Click Submit:

Submit CSV File - Product - The file volition upload in the Temp directory under the {SITE-ID}/bulkAssignProduct folder.

bulkassignProduct Binder - Navigate to Administration -> Jobs.
- Select the Bulk-Assign job and click Run.
- Verify the job completion condition.

Job Completion Condition - Majority Assign Product - Verify the video(due south) assigned.
Verify Videos Assign - Product - The file processed by Bulk-Assign chore will exist moved to the bulkAssignProduct_processed binder under the Temp directory.
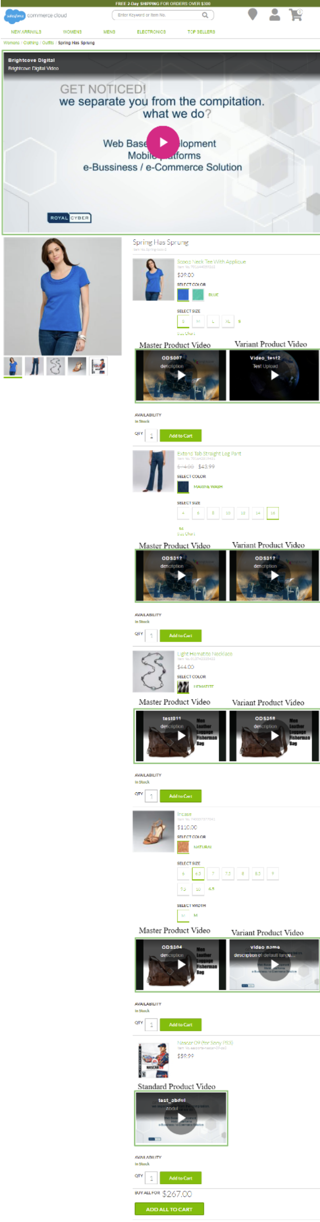
Sample implementations
Below are some pages for a sample implementation of Brightcove videos.
Storefront Reference Architecture (SFRA)
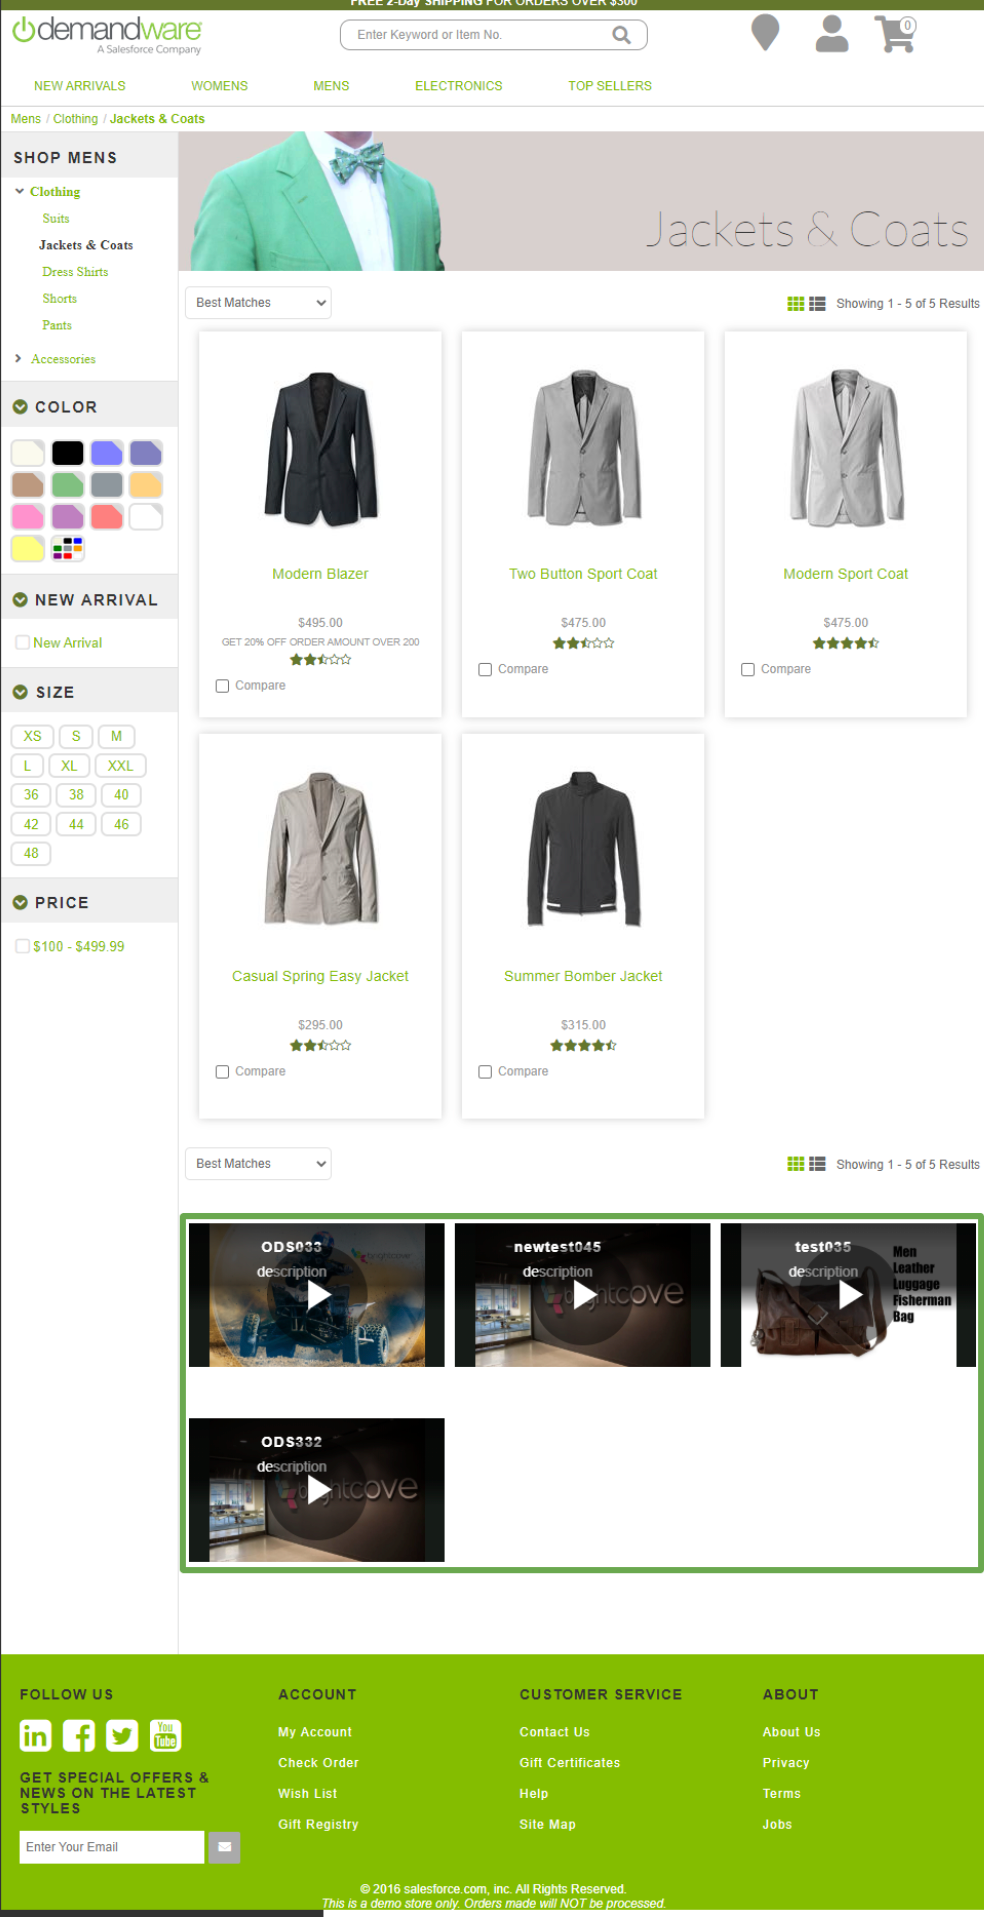
Category (catlanding, searchResultsNoDecorator)

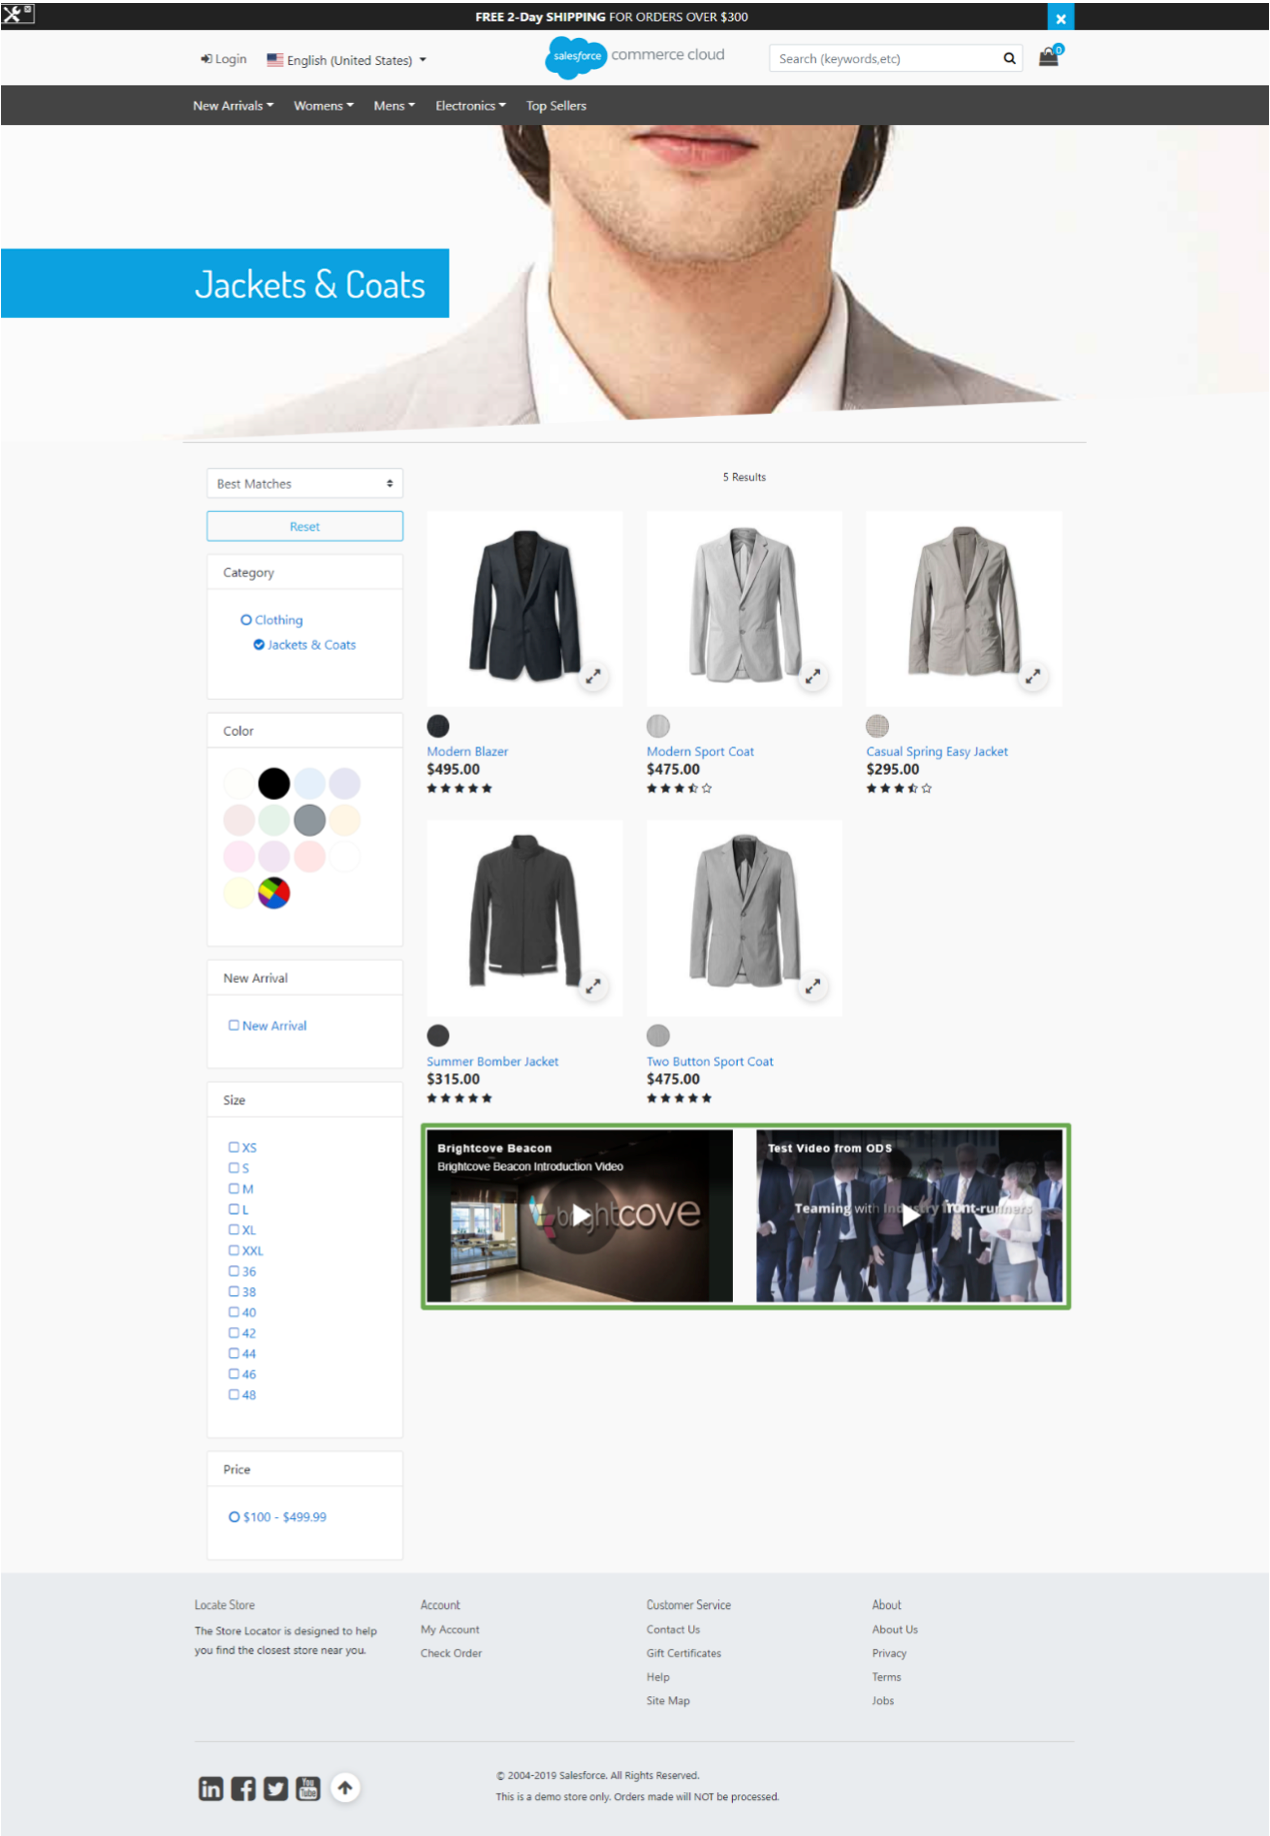
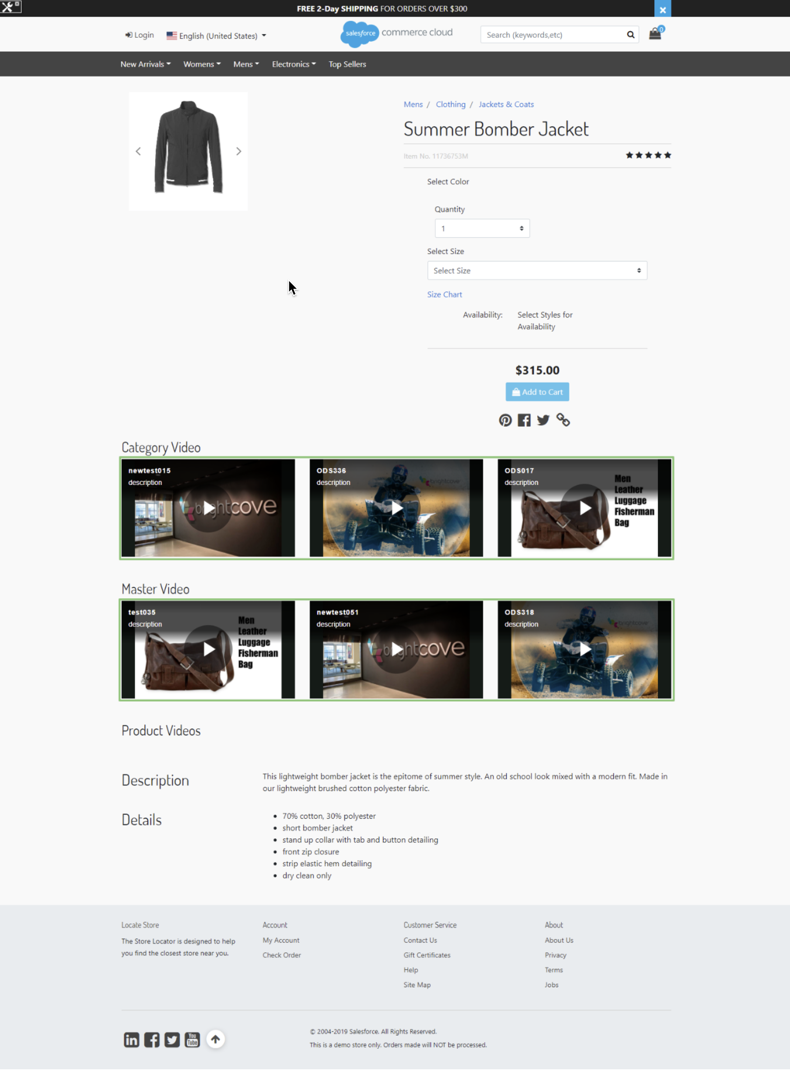
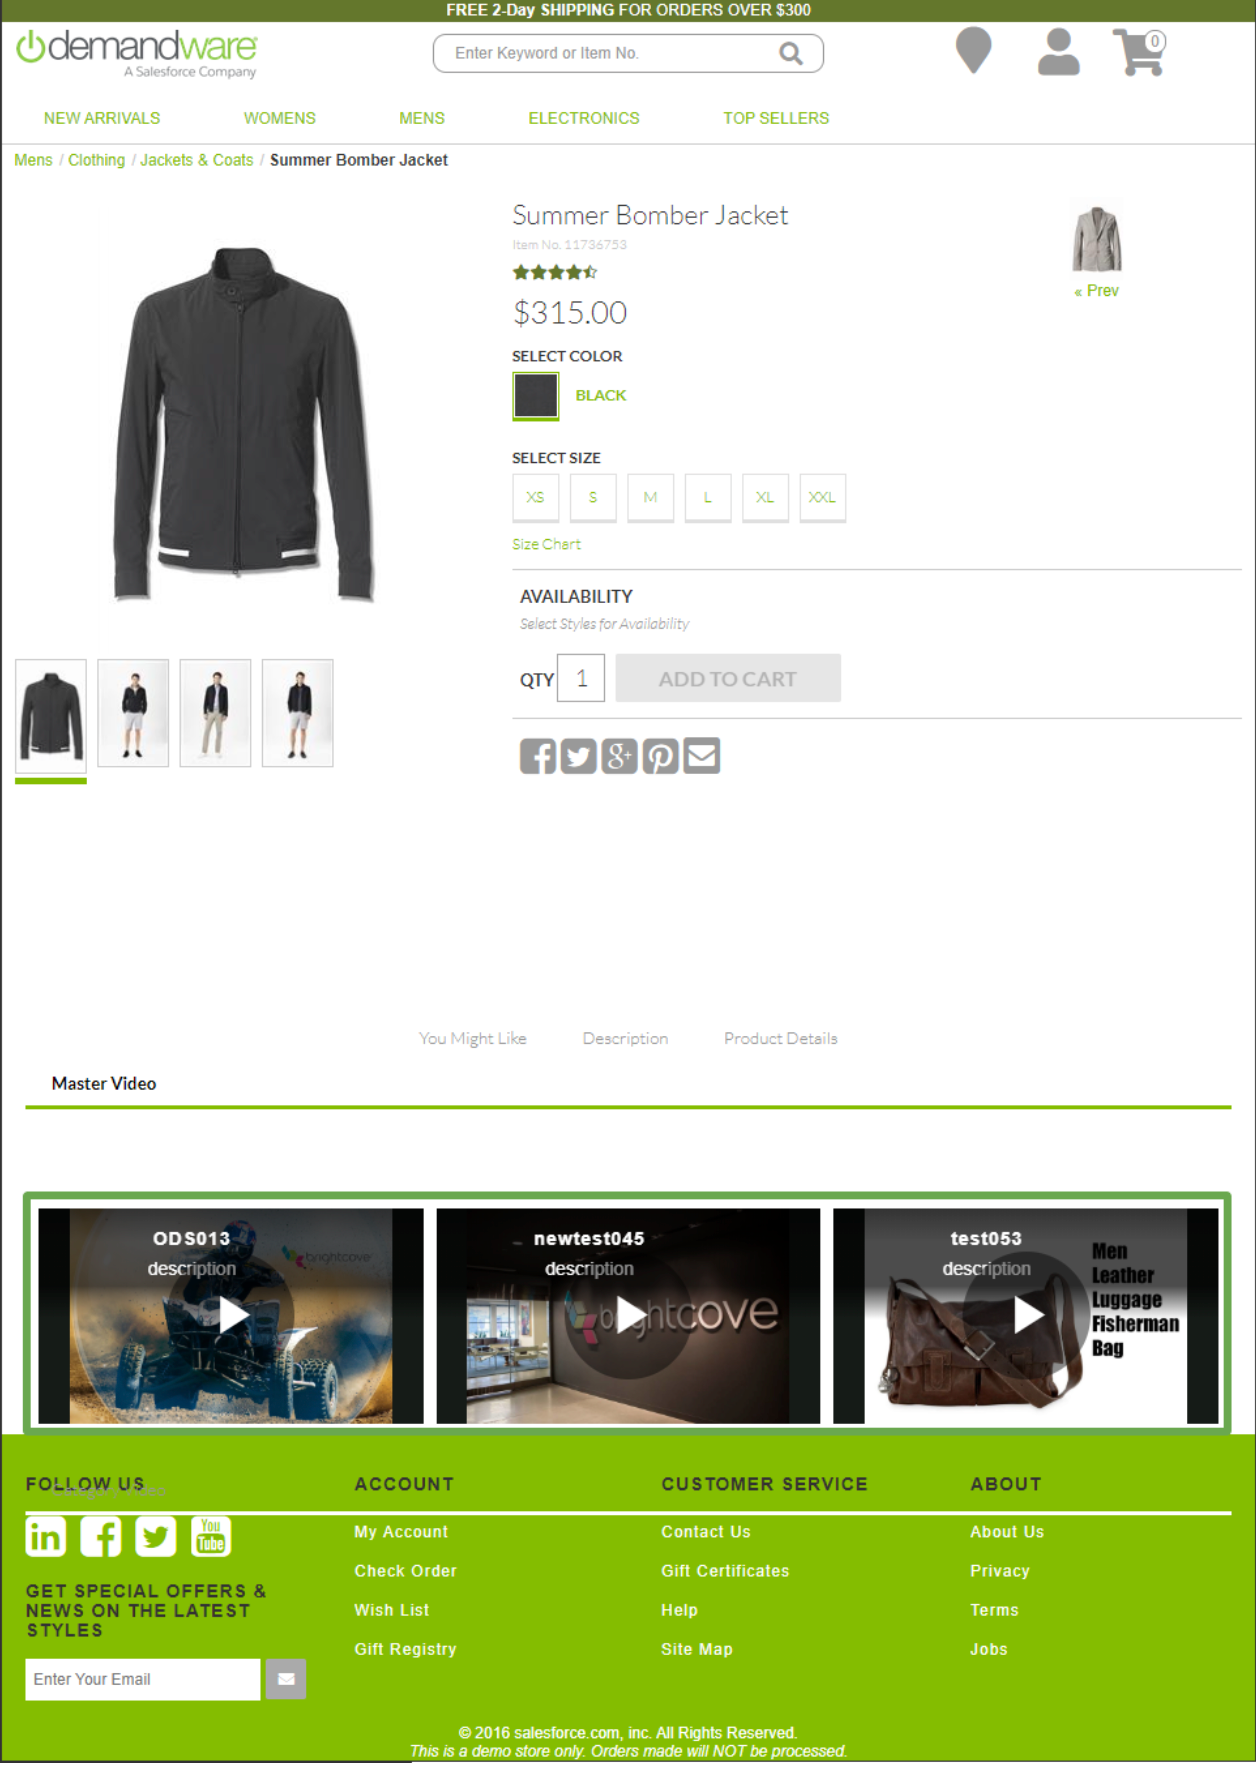
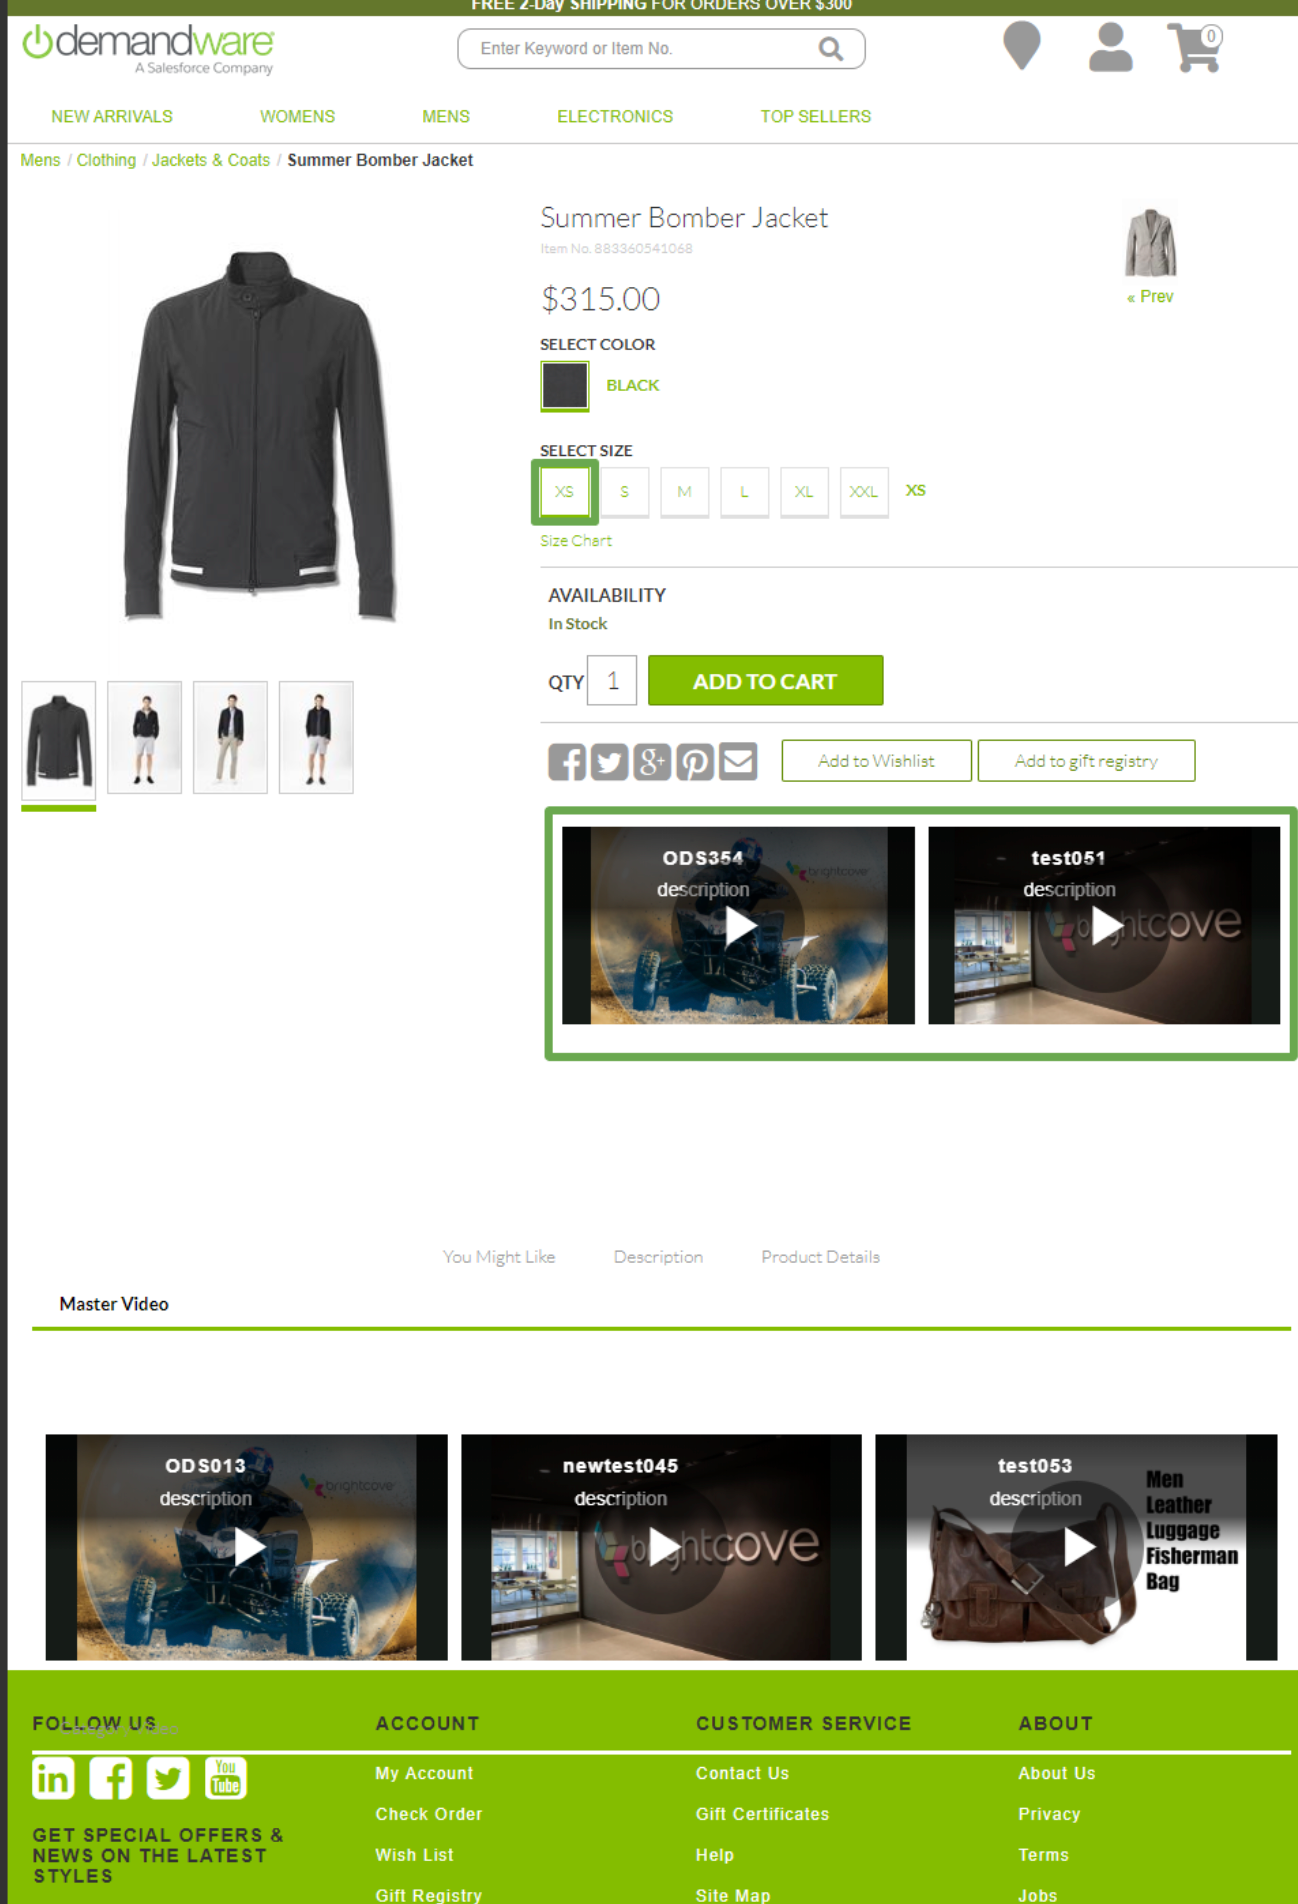
Production Folio Master/Variant Products (productDetails)
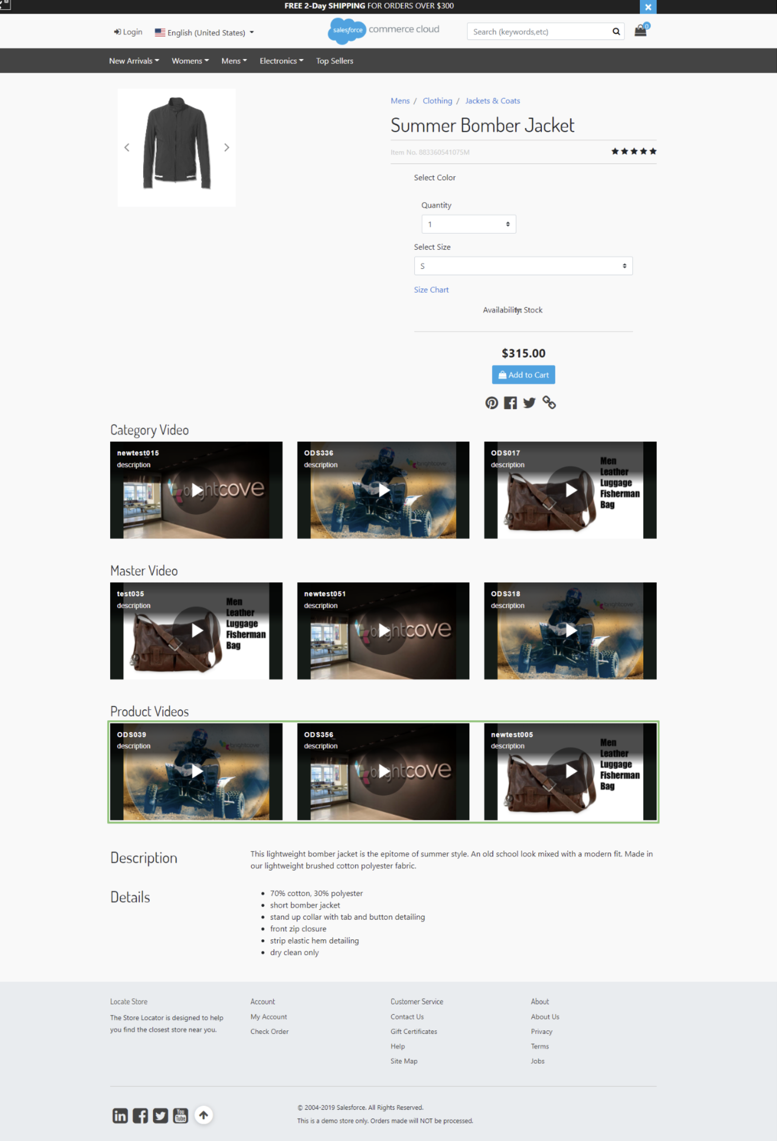
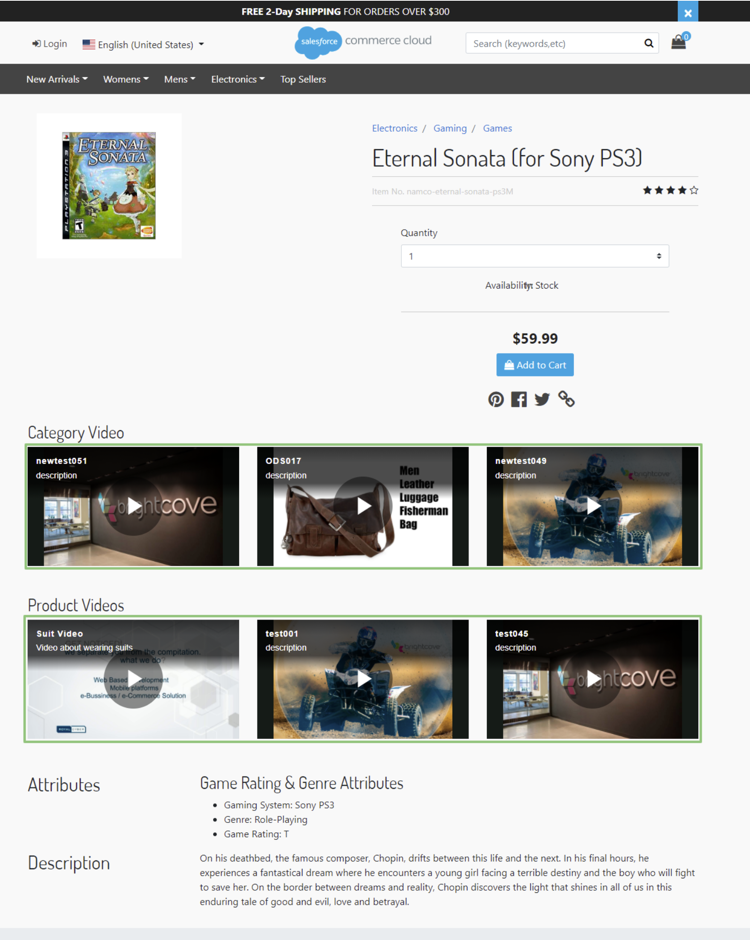
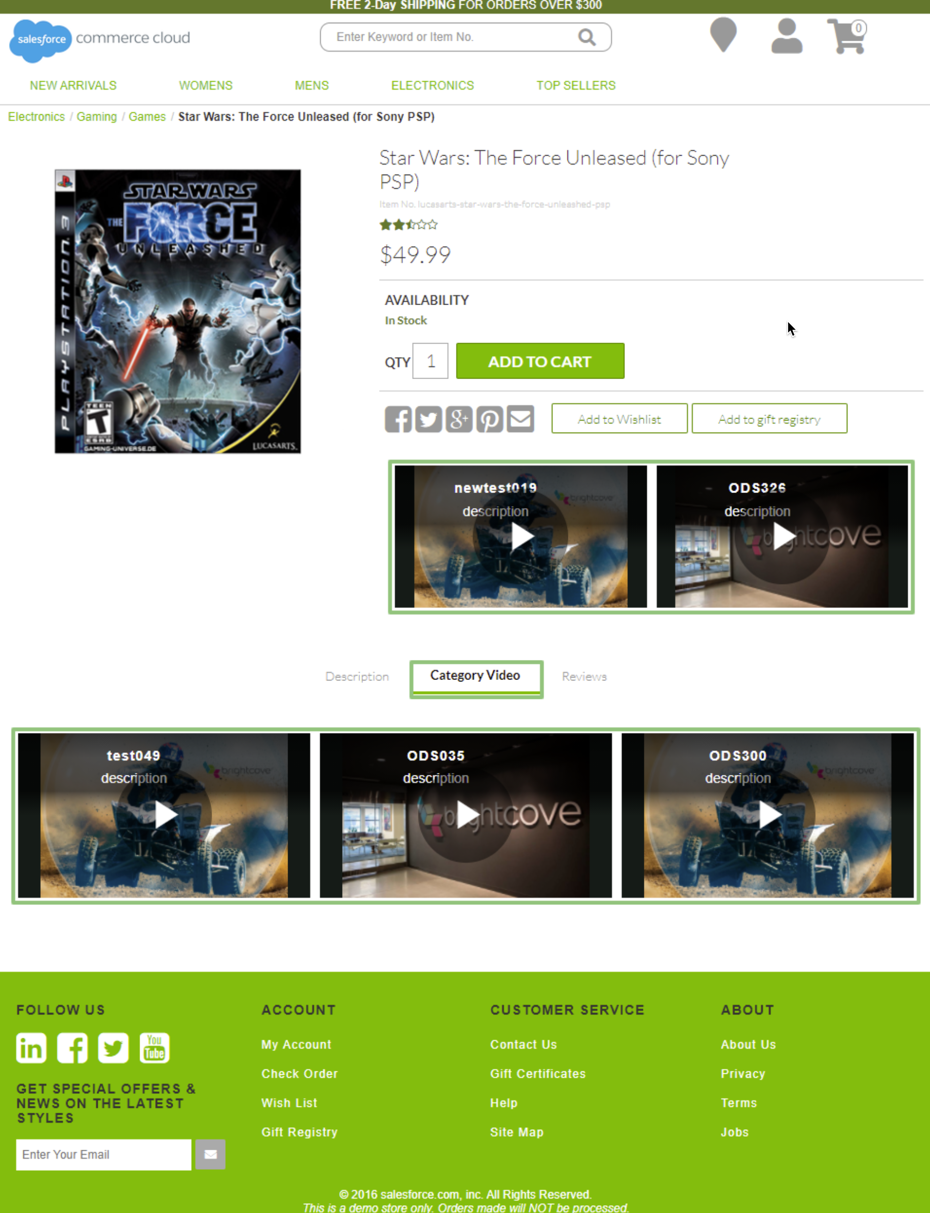
Product Page - Standard Products (product details)
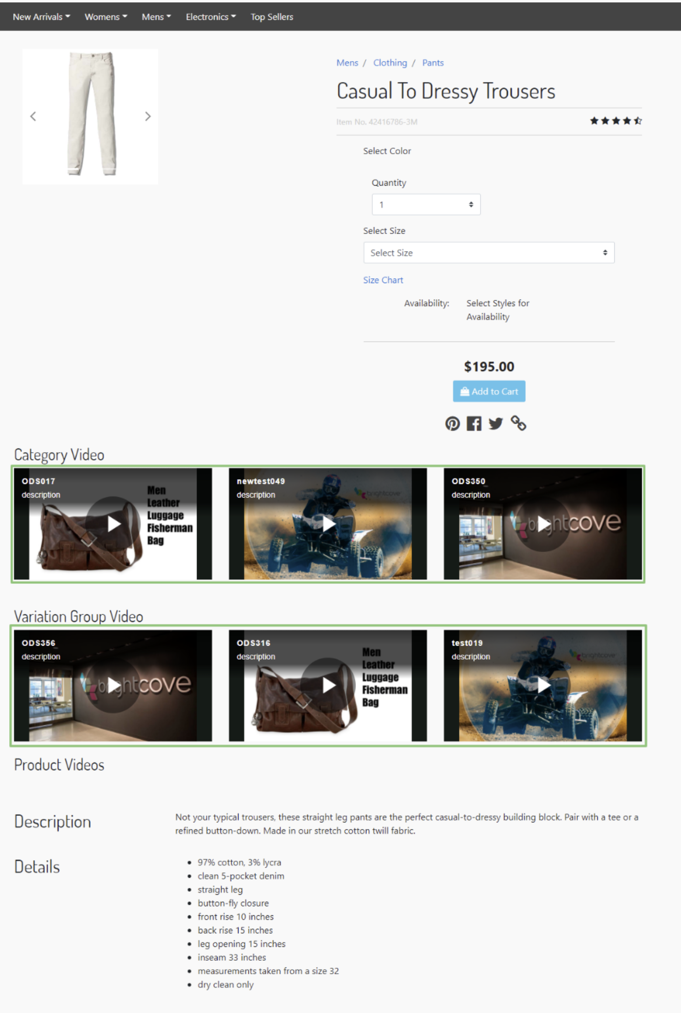
Product Page - Variation Group (product details)
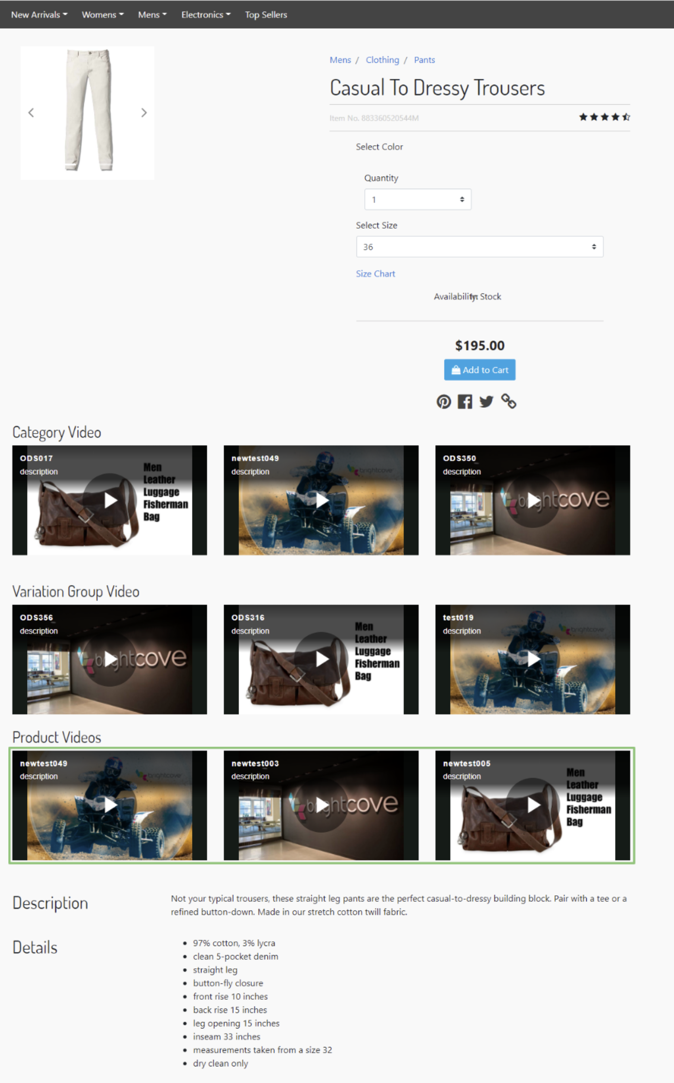
Product Page - Product Set (set details)
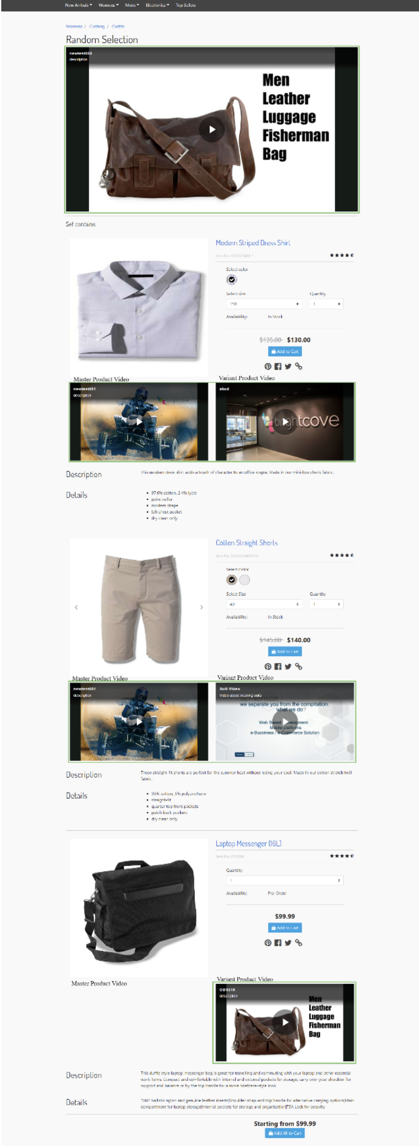
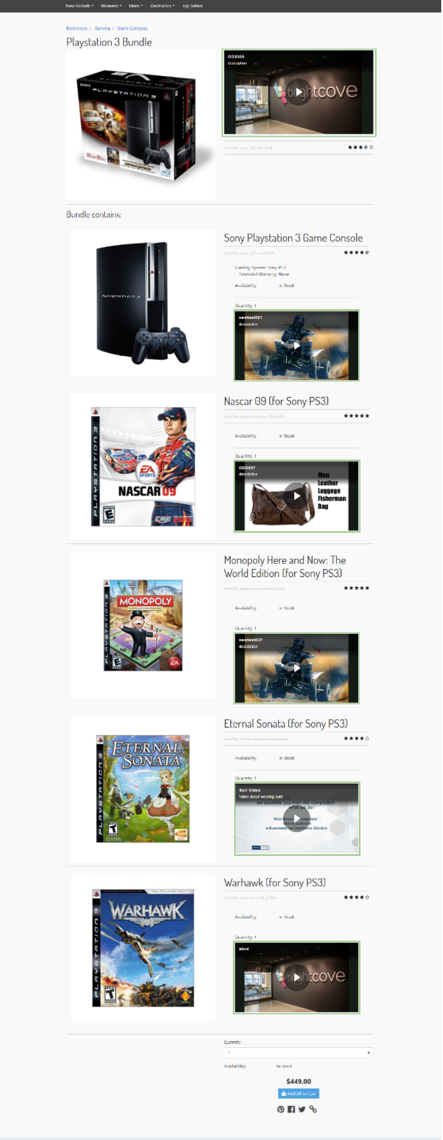
Product Page - Product Packet (bundle details)
SiteGenesis Compages
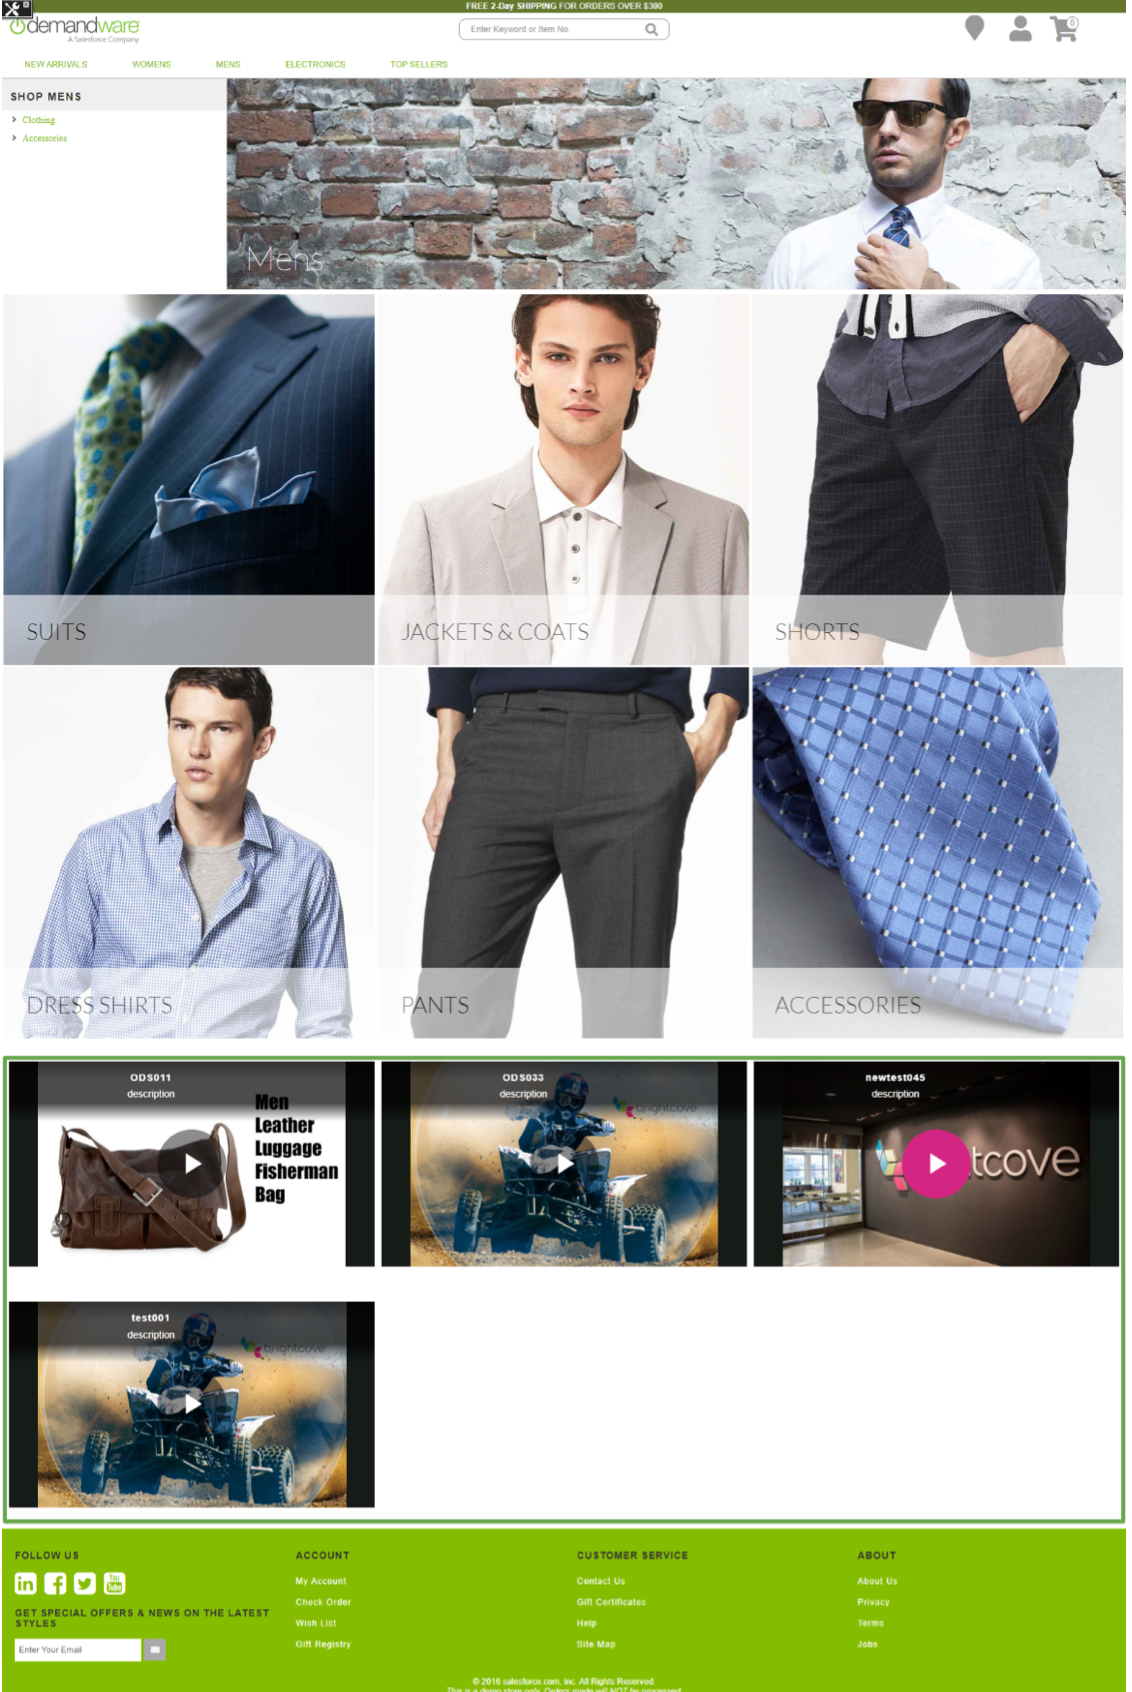
Category Folio (catlanding, categoryproducthits)
Product Folio - Master/Variant (productcontent, producttopcontent)
Product Page - Standard Products (productcontent, producttopcontent)
Product Page - Variation Group (productcontent, producttopcontent)
Product Folio - Product Set (producttopcontentPS)
Production Page - Product Bundle (producttopcontentPS)

Source: https://integrations.support.brightcove.com/ecommerce/salesforce/brightcove-custom-cartridge-salesforce-commerce-cloud-user-guide.html
0 Response to "Upload Products to Drupal 7 Commerce Video"
Post a Comment